> ## Documentation Index
> Fetch the complete documentation index at: https://docs.cdp.coinbase.com/llms.txt
> Use this file to discover all available pages before exploring further.
# Gasless Transactions on Base using CDP Paymaster
> Learn how to leverage CDP Paymaster for seamless, gasless transactions on Base.
Base transaction fees are typically less than a penny, but the concept of gas can still be confusing for new users and lead to poor user experience when users don't have gas funds in their wallet. You can abstract this away and improve your UX by using the **CDP Paymaster**. The Paymaster allows you to:
* Batch multi-step transactions
* Create custom gasless experiences
* Sponsor up to \$15k monthly on mainnet (unlimited on testnet)
If you need an increase in your sponsorship limit, please [reach out on Discord][Discord]!
## Objectives
1. Configure security measures to ensure safe and reliable transactions.
2. Manage and allocate resources for sponsored transactions.
3. Subsidize transaction fees for users, enhancing the user experience by making transactions free.
4. Set up and manage sponsored transactions on various schedules, including weekly, monthly, and daily cadences.
## Prerequisites
This tutorial assumes you have:
1. **A Coinbase Cloud Developer Platform Account**\
If not, sign up on the [CDP site]. Once you have your account, you can manage projects and utilize tools like the Paymaster.
2. **Familiarity with Smart Accounts and ERC 4337**\
Smart Accounts are the backbone of advanced transaction patterns (e.g., bundling, sponsorship). If you're new to ERC 4337, check out external resources like the official [EIP-4337 explainer](https://eips.ethereum.org/EIPS/eip-4337) before starting.
3. **Foundry**\
[Foundry] is a development environment, testing framework, and smart contract toolkit for Ethereum. You'll need it installed locally for generating key pairs and interacting with smart contracts.
Testnet vs. Mainnet
If you prefer not to spend real funds, you can switch to **Base Sepolia** (testnet). The steps below are conceptually the same. Just select *Base Sepolia* in the Coinbase Developer Platform instead of *Base Mainnet*, and use a contract deployed on Base testnet for your allowlisted methods.
## Set Up CDP Paymaster & Bundler
In this section, you will configure a Paymaster to sponsor payments on behalf of a specific smart contract for a specified amount.
1. **Navigate to the [Coinbase Developer Platform].**
2. Create or select your project from the upper left corner of the screen.
3. Click on the **Paymaster** tool from the left navigation.
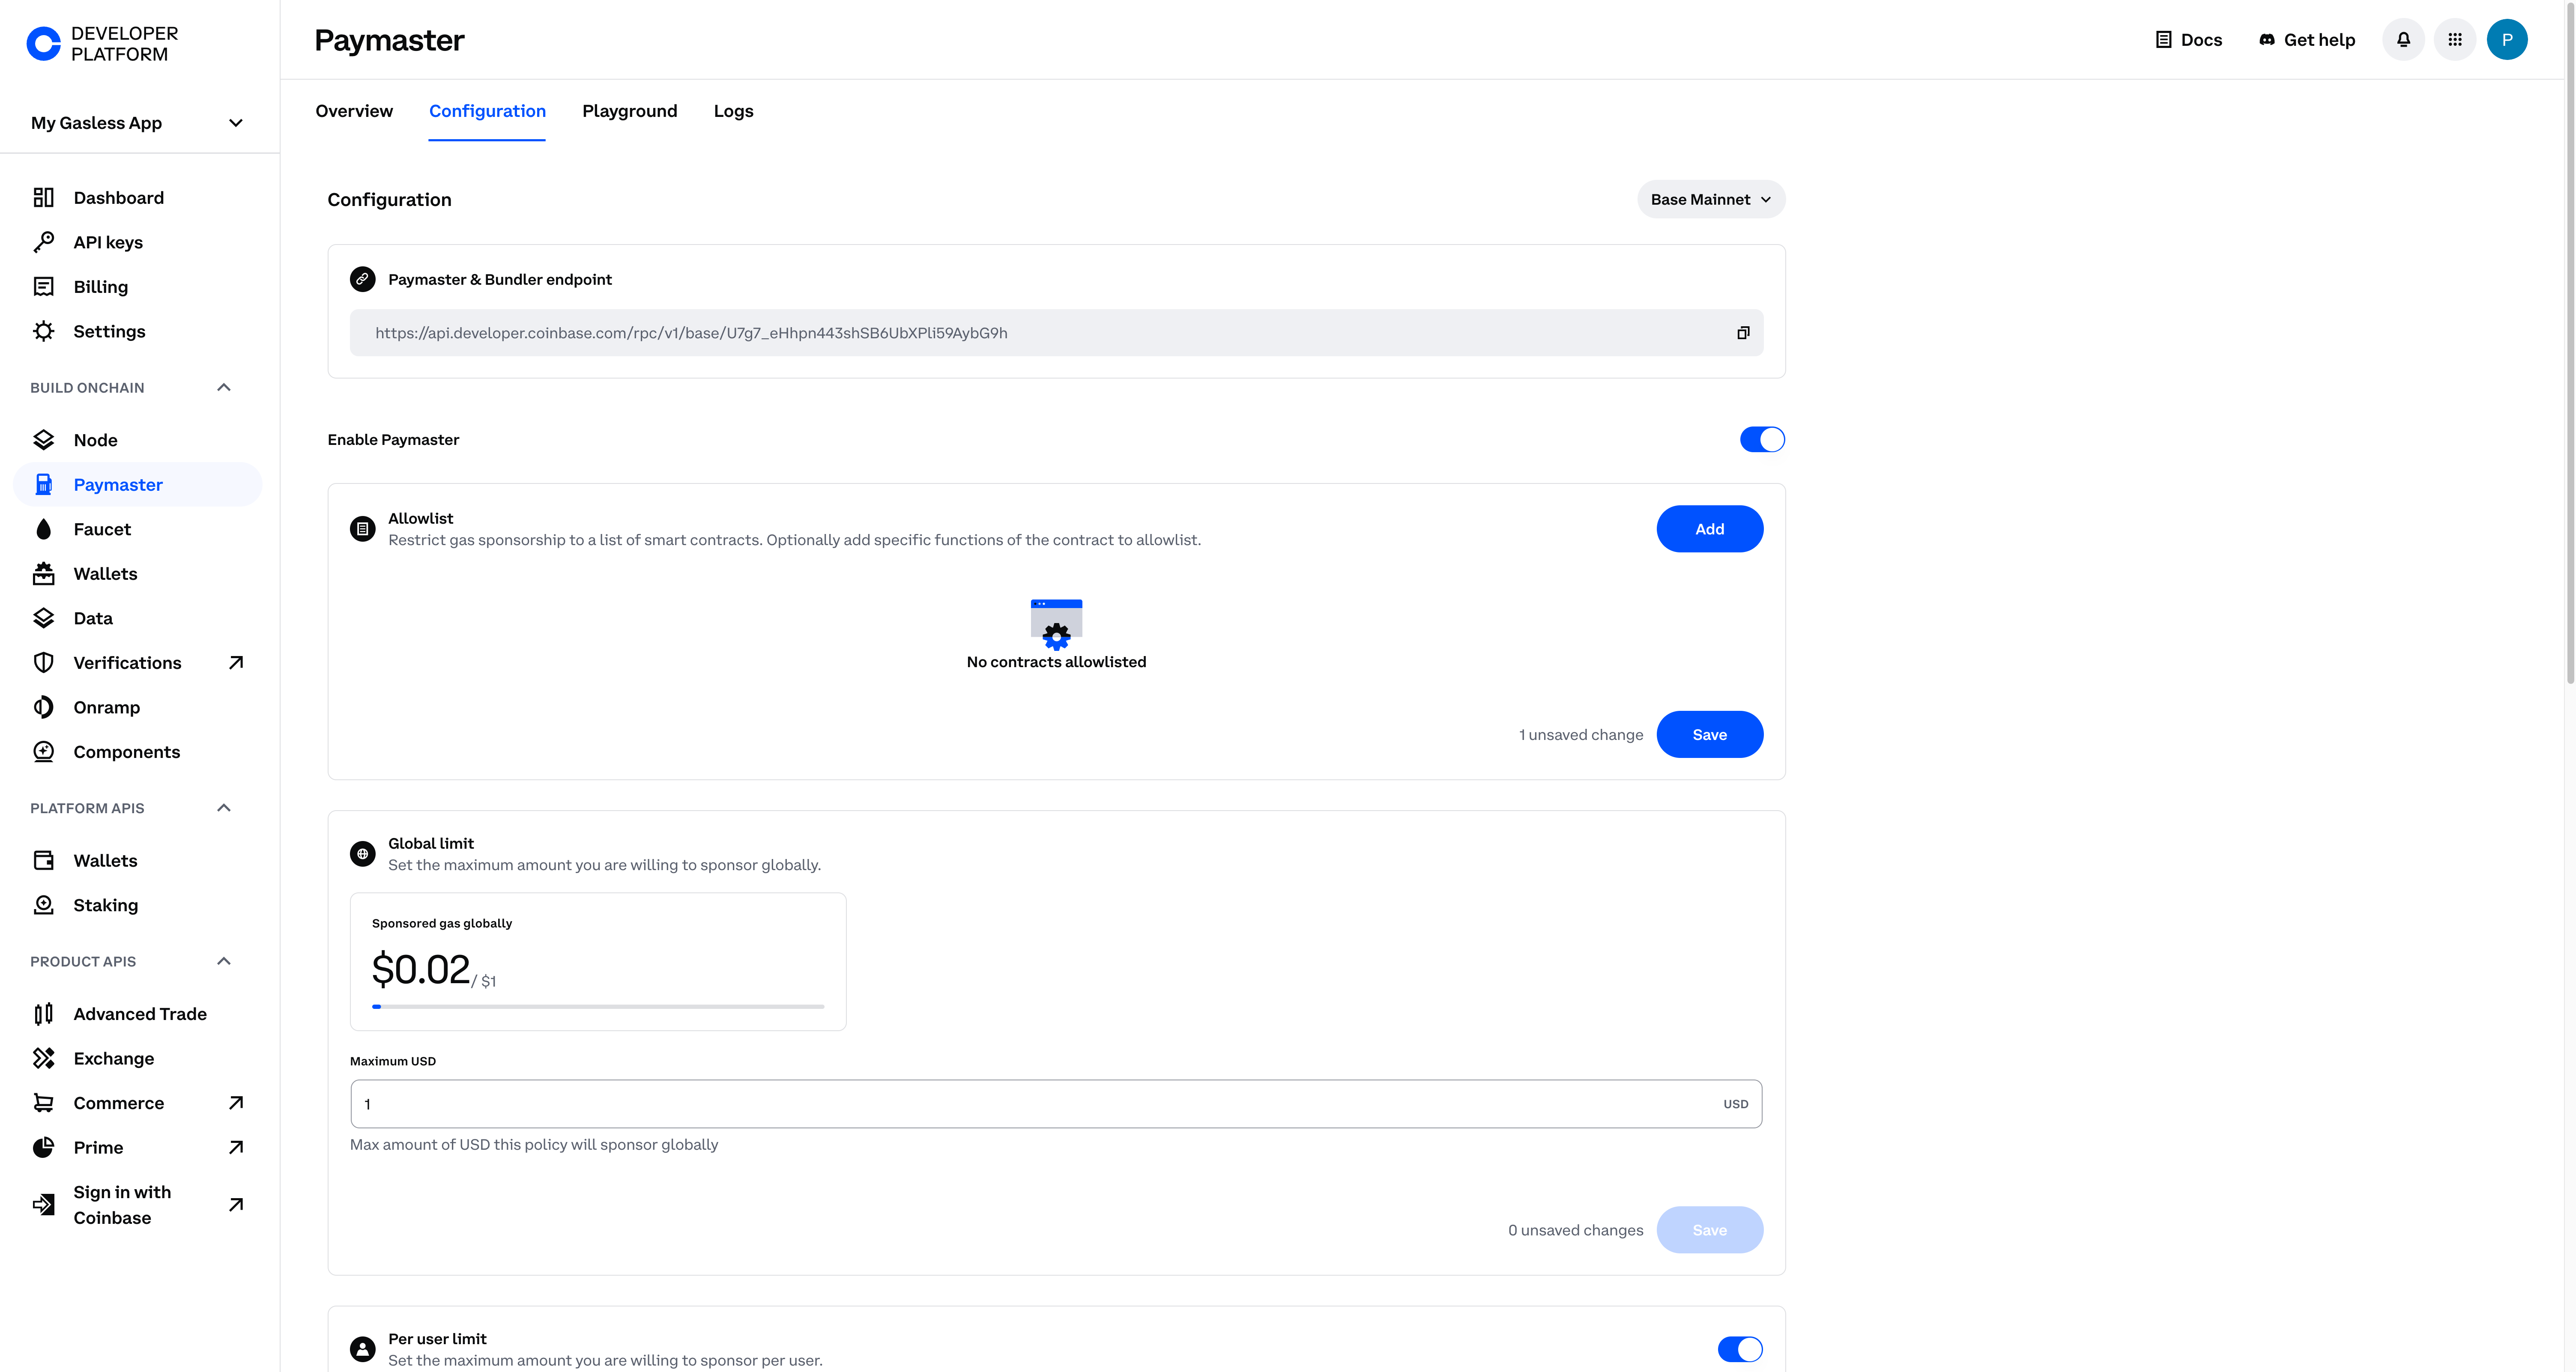
4. Go to the **Configuration** tab and copy the **RPC URL** to your clipboard — you'll need this shortly in your code.
### Screenshots
**Select your project**
 **Navigate to the Paymaster tool**
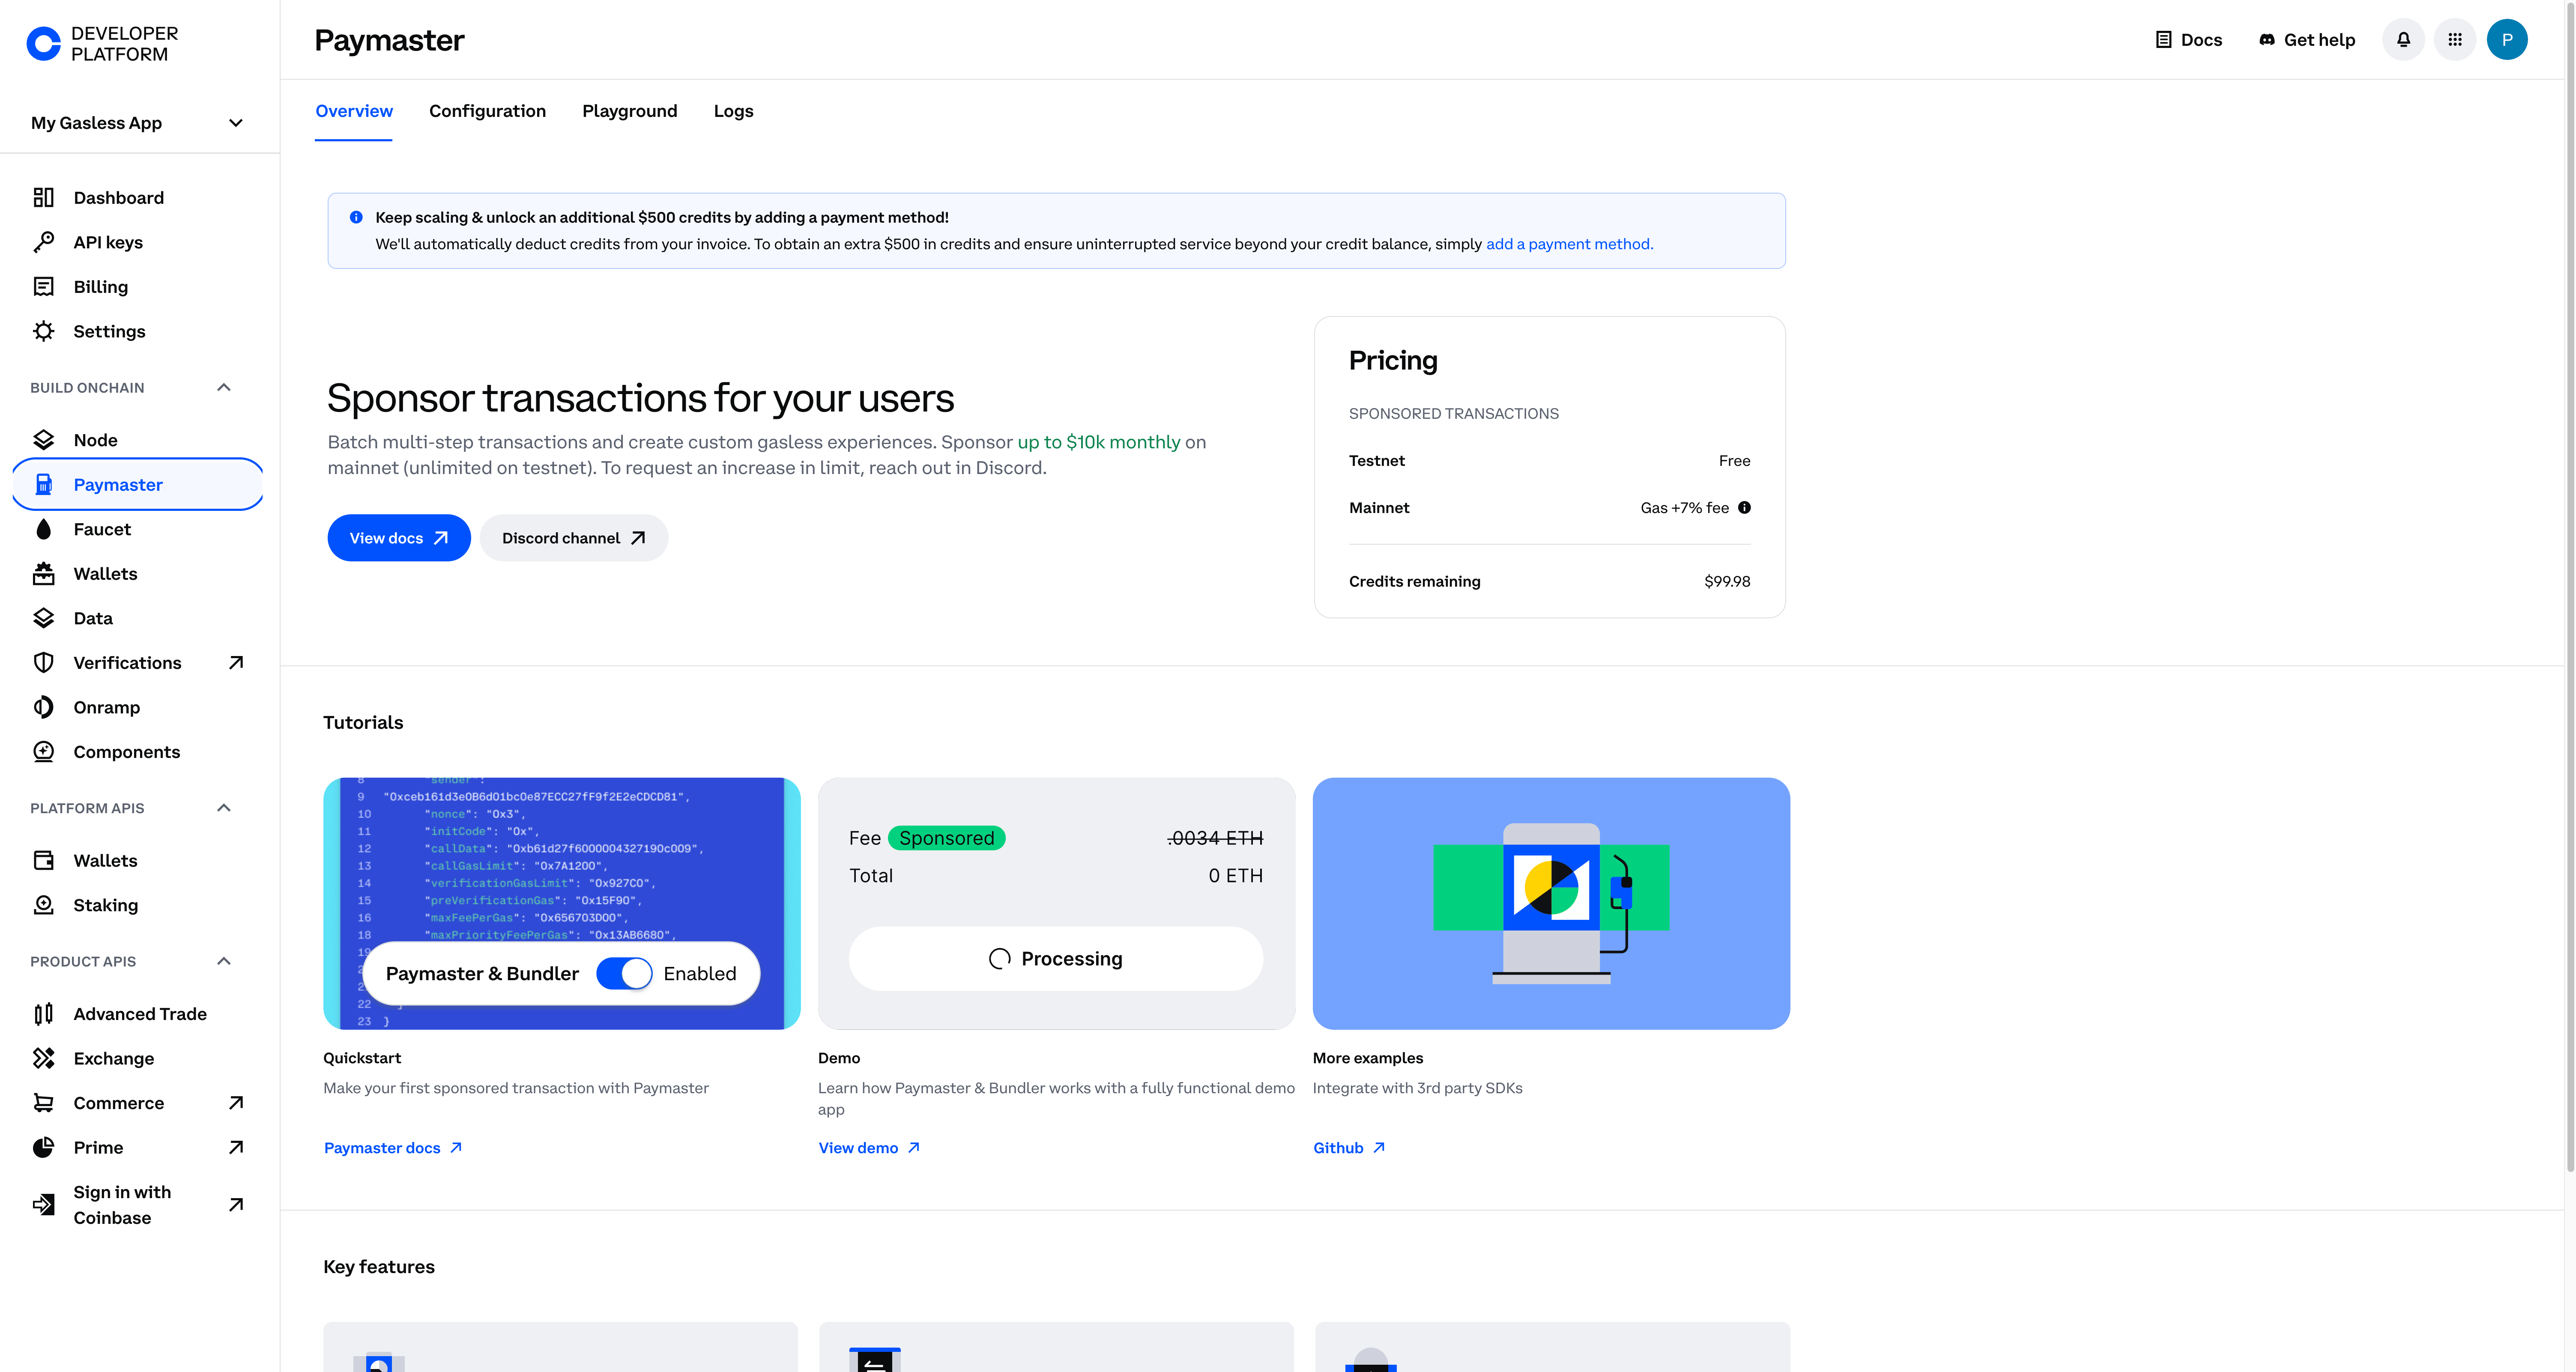 **Navigate to the configuration screen**
 ### Allowlist a Sponsorable Contract
1. From the Configuration page, ensure **Base Mainnet** (or **Base Sepolia** if you're testing) is selected.
2. Enable your paymaster by clicking the toggle button.
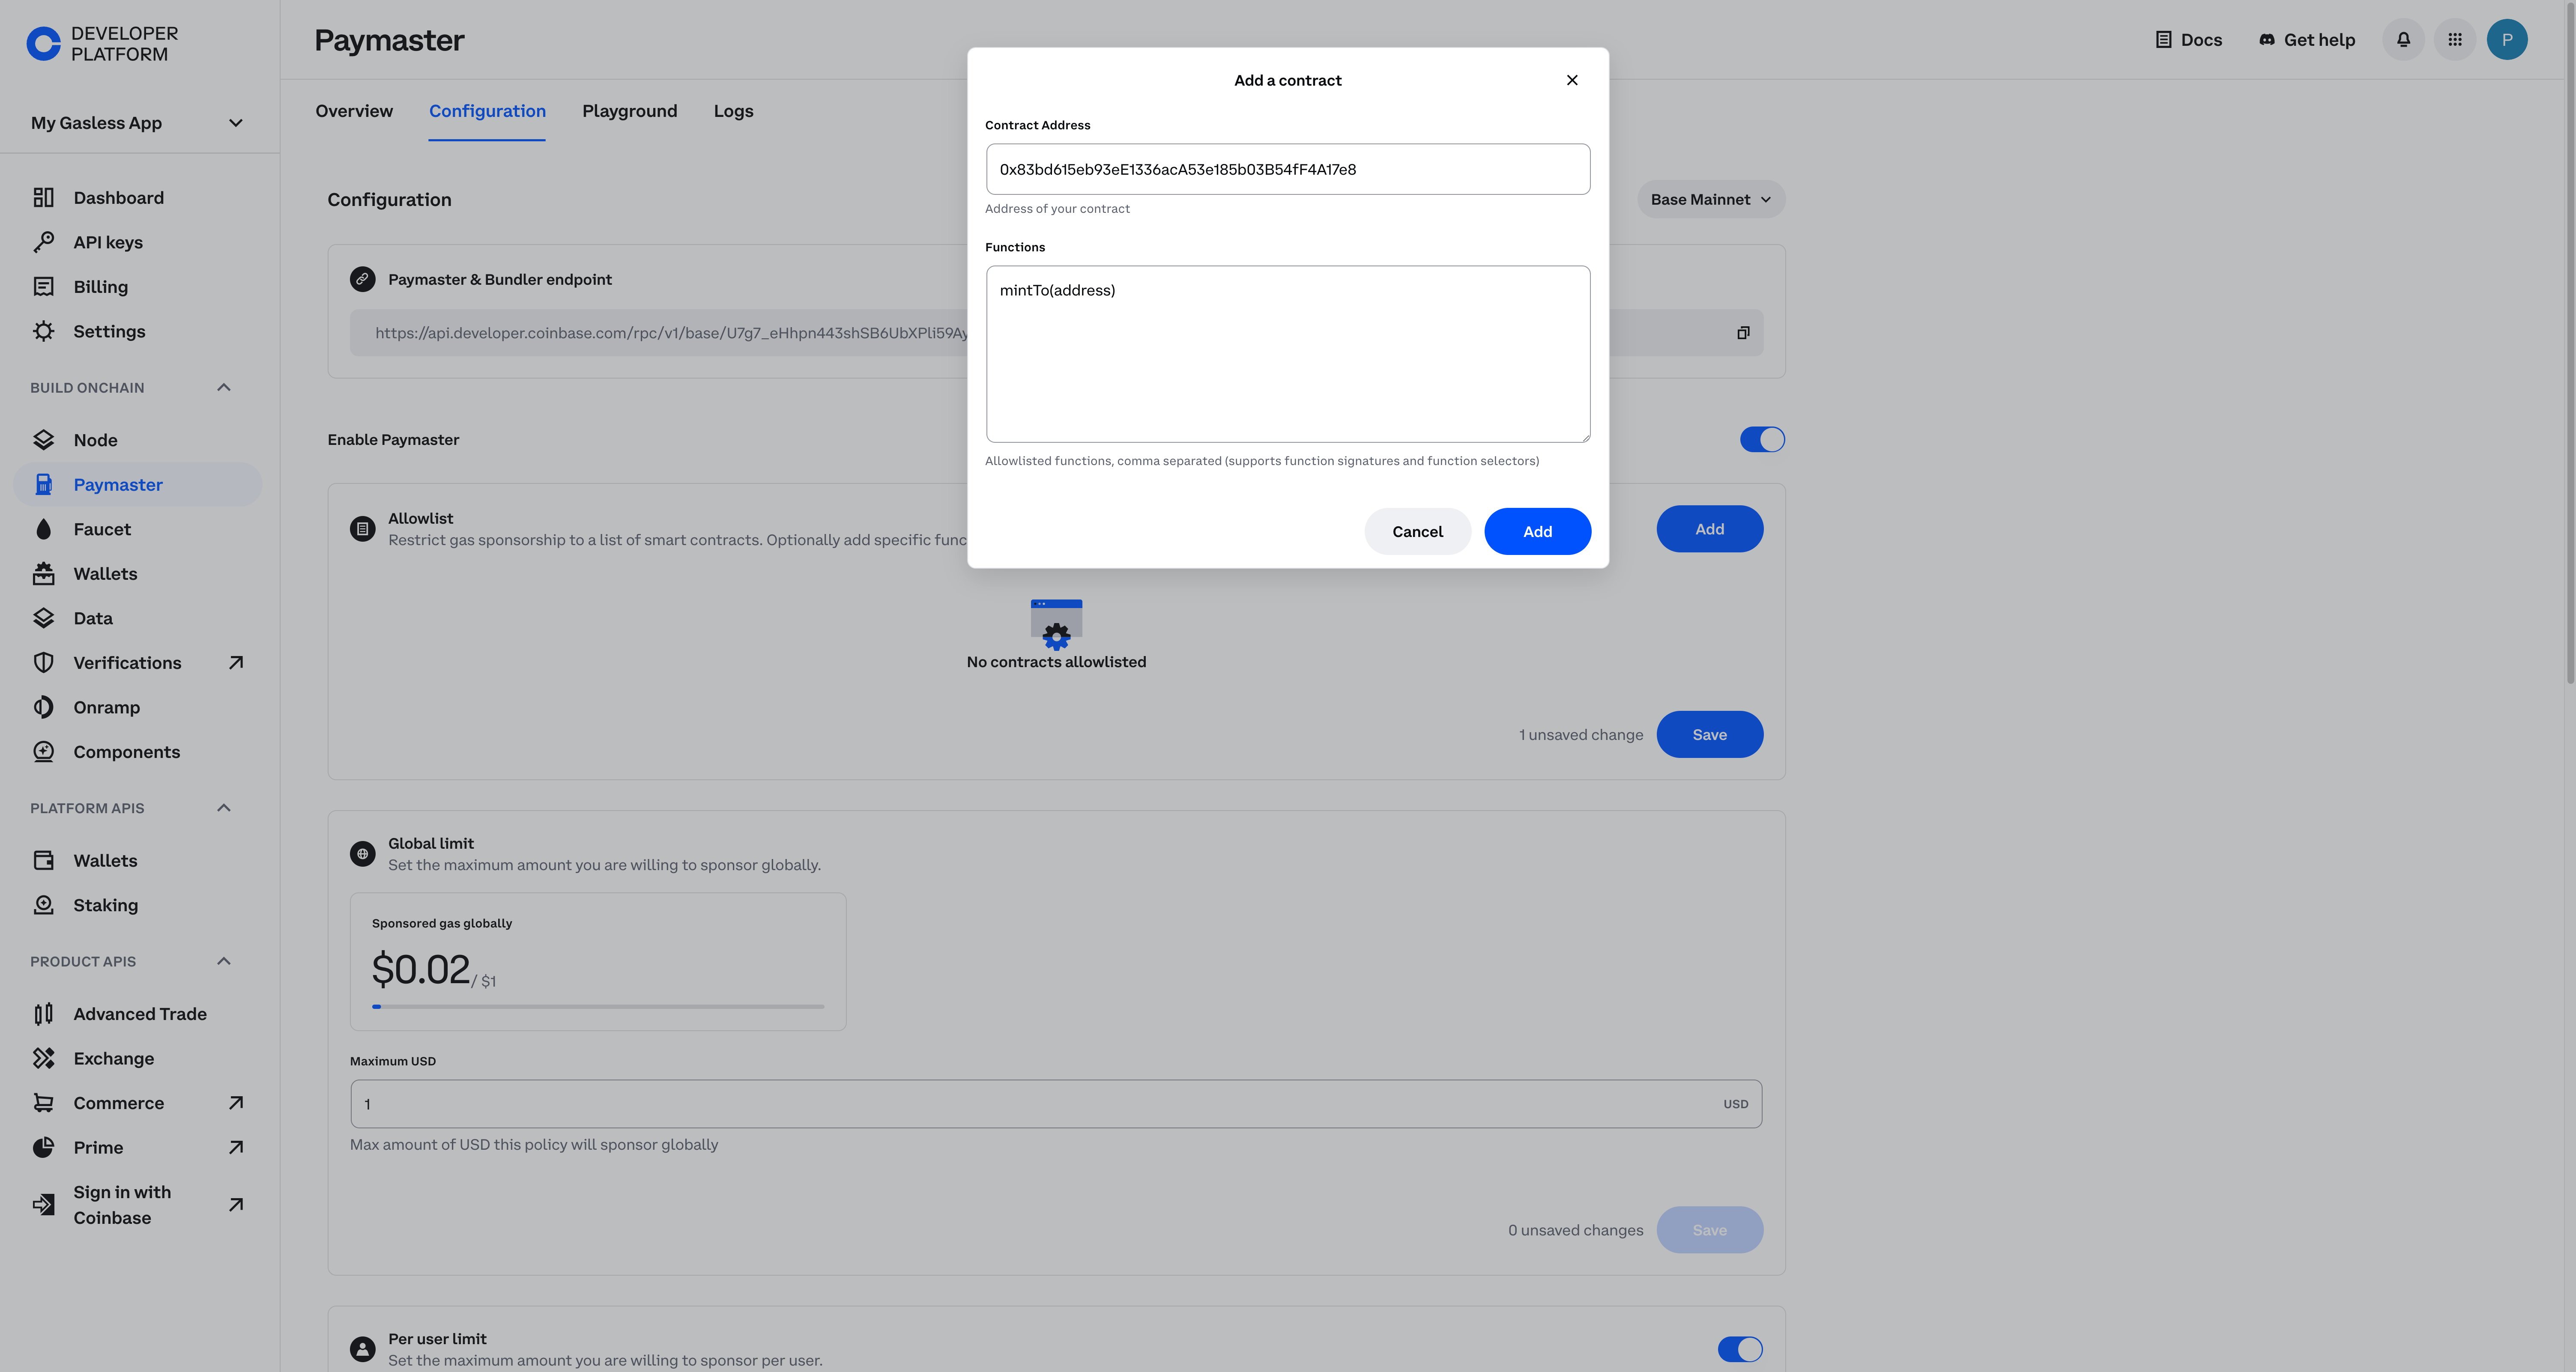
3. Click **Add** to add an allowlisted contract.
4. For this example, add [`0x83bd615eb93eE1336acA53e185b03B54fF4A17e8`][simple NFT contract], and add the function `mintTo(address)`.
### Allowlist a Sponsorable Contract
1. From the Configuration page, ensure **Base Mainnet** (or **Base Sepolia** if you're testing) is selected.
2. Enable your paymaster by clicking the toggle button.
3. Click **Add** to add an allowlisted contract.
4. For this example, add [`0x83bd615eb93eE1336acA53e185b03B54fF4A17e8`][simple NFT contract], and add the function `mintTo(address)`.
 Use your own contract
We use a [simple NFT contract][simple NFT contract] on Base mainnet as an example. Feel free to substitute your own.
### Global & Per User Limits
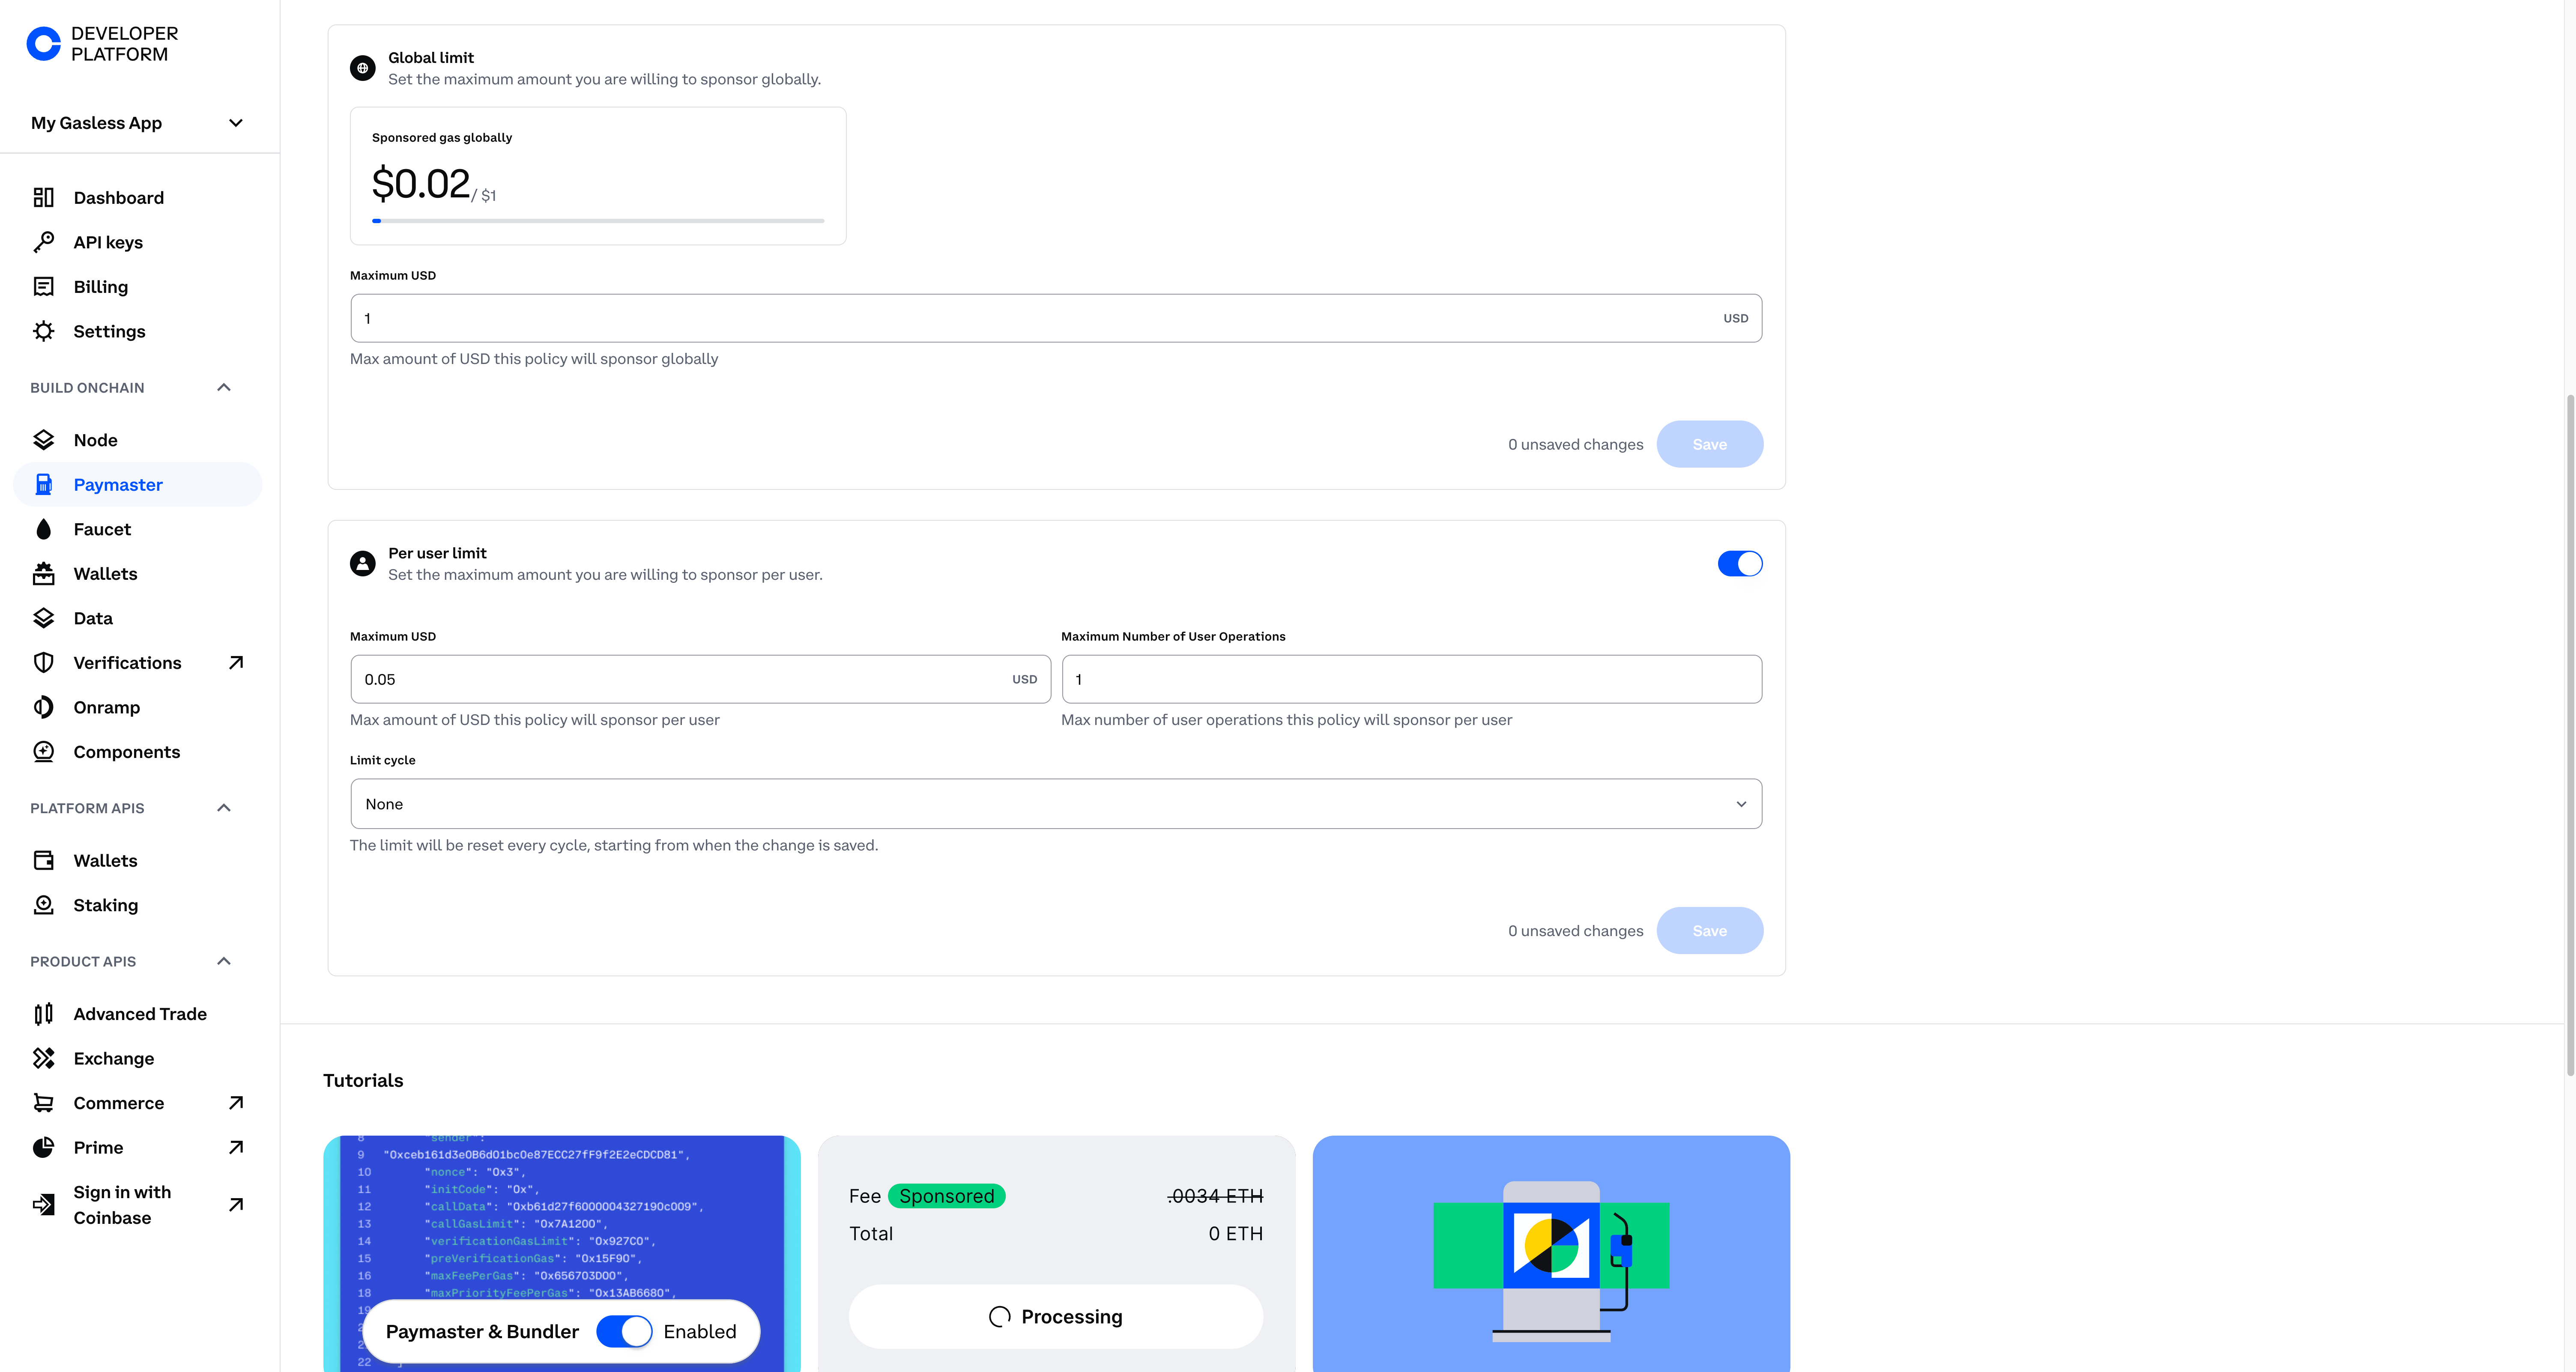
Scroll down to the **Per User Limit** section. You can set:
* **Dollar amount limit** or **number of UserOperations** per user
* **Limit cycles** that reset daily, weekly, or monthly
For example, you might set:
* `max USD` to `$0.05`
* `max UserOperation` to `1`
This means **each user** can only have \$0.05 in sponsored gas and **1** user operation before the cycle resets.
Limit Cycles
These reset based on the selected cadence (daily, weekly, monthly).
Next, **set the Global Limit**. For example, set this to `$0.07` so that once the entire paymaster has sponsored \$0.07 worth of gas (across all users), no more sponsorship occurs unless you raise the limit.
Use your own contract
We use a [simple NFT contract][simple NFT contract] on Base mainnet as an example. Feel free to substitute your own.
### Global & Per User Limits
Scroll down to the **Per User Limit** section. You can set:
* **Dollar amount limit** or **number of UserOperations** per user
* **Limit cycles** that reset daily, weekly, or monthly
For example, you might set:
* `max USD` to `$0.05`
* `max UserOperation` to `1`
This means **each user** can only have \$0.05 in sponsored gas and **1** user operation before the cycle resets.
Limit Cycles
These reset based on the selected cadence (daily, weekly, monthly).
Next, **set the Global Limit**. For example, set this to `$0.07` so that once the entire paymaster has sponsored \$0.07 worth of gas (across all users), no more sponsorship occurs unless you raise the limit.
 ## Test Your Paymaster Policy
Now let's verify that these policies work. We'll:
1. Create two local key pairs (or use private keys you own).
2. Generate two Smart Accounts.
3. Attempt to sponsor multiple transactions to see your policy in action.
### Installing Foundry
1. Ensure you have **Rust** installed
```bash theme={null}
curl --proto '=https' --tlsv1.2 -sSf https://sh.rustup.rs | sh
```
2. Install Foundry
```bash theme={null}
curl -L https://foundry.paradigm.xyz | bash
foundryup
```
3. Verify it works
```bash theme={null}
cast --help
```
If you see Foundry usage info, you're good to go!
### Create Your Project & Generate Key Pairs
1. Make a new folder and install dependencies, `viem` and `permissionless`:
```bash theme={null}
mkdir sponsored_transactions
cd sponsored_transactions
npm init es6
npm install permissionless
npm install viem
touch index.js
```
2. Generate two key pairs with Foundry:
```bash theme={null}
cast wallet new
cast wallet new
```
You'll see something like:
```bash theme={null}
Successfully created new keypair.
Address: 0xD440D746...
Private key: 0x01c9720c1dfa3c9...
```
**Store these private keys somewhere safe**
### Project Structure With Environment Variables
Create a `.env` file in the `sponsored_transactions` directory. In the `.env`, you'll add the rpcURL for your paymaster and the private keys for your accounts:
\[Find your Paymaster & Bundler endpoint]
The Paymaster & Bundler endpoint is the URL for your Coinbase Developer Platform (CDP) Paymaster.
This was saved in the previous section and follows this format: `https://api.developer.coinbase.com/rpc/v1/base/`
Navigate to the [Paymaster Tool] and select the `Configuration` tab at the top of the screen to obtain your RPC URL.
\[Secure your endpoints]
You will create a constant for our Paymaster & Bundler endpoint obtained from cdp.portal.coinbase.com. The most secure way to do this is by using a proxy. For the purposes of this demo, hardcode it into our `index.js` file. For product, we highly recommend using a [proxy service].
```bash lines wrap theme={null}
PAYMASTER_RPC_URL=https://api.developer.coinbase.com/rpc/v1/base/
PRIVATE_KEY_1=0x01c9720c1dfa3c9...
PRIVATE_KEY_2=0xbcd6fbc1dfa3c9...
```
Never commit `.env` files to a public repo!
## Example `index.js`
Below is a full example of how you might structure `index.js`.
```js twoslash [expandable] lines wrap theme={null}
// --- index.js ---
// @noErrors
// 1. Import modules and environment variables
import 'dotenv/config';
import { http, createPublicClient, encodeFunctionData } from 'viem';
import { base } from 'viem/chains';
import { createSmartAccountClient } from 'permissionless';
import { privateKeyToSimpleSmartAccount } from 'permissionless/accounts';
import { createPimlicoPaymasterClient } from 'permissionless/clients/pimlico';
// 2. Retrieve secrets from .env
// Highlight: environment variables for paymaster, private keys
const rpcUrl = process.env.PAYMASTER_RPC_URL; // highlight
const firstPrivateKey = process.env.PRIVATE_KEY_1; // highlight
const secondPrivateKey = process.env.PRIVATE_KEY_2; // highlight
// 3. Declare Base addresses (entrypoint & factory)
const baseEntryPoint = '0x5FF137D4b0FDCD49DcA30c7CF57E578a026d2789';
const baseFactoryAddress = '0x15Ba39375ee2Ab563E8873C8390be6f2E2F50232';
// 4. Create a public client for Base
const publicClient = createPublicClient({
chain: base,
transport: http(rpcUrl),
});
// 5. Setup Paymaster client
const cloudPaymaster = createPimlicoPaymasterClient({
chain: base,
transport: http(rpcUrl),
entryPoint: baseEntryPoint,
});
// 6. Create Smart Accounts from the private keys
async function initSmartAccounts() {
const simpleAccount = await privateKeyToSimpleSmartAccount(publicClient, {
privateKey: firstPrivateKey,
factoryAddress: baseFactoryAddress,
entryPoint: baseEntryPoint,
});
const simpleAccount2 = await privateKeyToSimpleSmartAccount(publicClient, {
privateKey: secondPrivateKey,
factoryAddress: baseFactoryAddress,
entryPoint: baseEntryPoint,
});
// 7. Create SmartAccountClient for each
const smartAccountClient = createSmartAccountClient({
account: simpleAccount,
chain: base,
bundlerTransport: http(rpcUrl),
middleware: {
sponsorUserOperation: cloudPaymaster.sponsorUserOperation,
},
});
const smartAccountClient2 = createSmartAccountClient({
account: simpleAccount2,
chain: base,
bundlerTransport: http(rpcUrl),
middleware: {
sponsorUserOperation: cloudPaymaster.sponsorUserOperation,
},
});
return { smartAccountClient, smartAccountClient2 };
}
// 8. ABI for the NFT contract
const nftAbi = [
// ...
// truncated for brevity
];
// 9. Example function to send a transaction from a given SmartAccountClient
async function sendTransaction(client, recipientAddress) {
try {
// encode the "mintTo" function call
const callData = encodeFunctionData({
abi: nftAbi,
functionName: 'mintTo',
args: [recipientAddress], // highlight: specify who gets the minted NFT
});
const txHash = await client.sendTransaction({
account: client.account,
to: '0x83bd615eb93eE1336acA53e185b03B54fF4A17e8', // address of the NFT contract
data: callData,
value: 0n,
});
console.log(`✅ Transaction successfully sponsored for ${client.account.address}`);
console.log(`🔍 View on BaseScan: https://basescan.org/tx/${txHash}`);
} catch (error) {
console.error('Transaction failed:', error);
}
}
// 10. Main flow: init accounts, send transactions
(async () => {
const { smartAccountClient, smartAccountClient2 } = await initSmartAccounts();
// Send a transaction from the first account
await sendTransaction(smartAccountClient, smartAccountClient.account.address);
// Send a transaction from the second account
// For variety, let's also mint to the second account's own address
await sendTransaction(smartAccountClient2, smartAccountClient2.account.address);
})();
```
Now that the code is implemented, lets run it:
Run this via `node index.js` from your project root.
```bash lines wrap theme={null}
node index.js
```
You should see a "Transaction successfully sponsored" output.
To confirm that your spend policies are correctly in place, try running the script again. If your Paymaster settings are strict (e.g., limit 1 transaction per user), the second time you run the script, you may get a "request denied" error, indicating the policy is working.
## Hitting Policy Limits & Troubleshooting
1. **Per-User Limit**\
If you see an error like:
```json theme={null}
{
"code": -32001,
"message": "request denied - rejected due to maximum per address transaction count reached"
}
```
That means you've hit your **UserOperation** limit for a single account. Return to the [Coinbase Developer Platform] UI to adjust the policy.
2. **Global Limit**\
If you repeatedly run transactions and eventually see:
```json theme={null}
{
"code": -32001,
"message": "request denied - rejected due to max global usd spend limit reached"
}
```
You've hit the **global** limit of sponsored gas. Increase it in the CDP dashboard and wait a few minutes for changes to take effect.
## Verifying Token Ownership (Optional)
Want to confirm the token actually minted? You can read the NFT's `balanceOf` function:
```js lines wrap theme={null}
import { readContract } from 'viem'; // highlight
// example function
async function checkNftBalance(publicClient, contractAddress, abi, ownerAddress) {
const balance = await publicClient.readContract({
address: contractAddress,
abi,
functionName: 'balanceOf',
args: [ownerAddress],
});
console.log(`NFT balance of ${ownerAddress} is now: ${balance}`);
}
```
## Conclusion
In this tutorial, you:
* Set up and **configured** CDP Paymaster on the Coinbase Developer Platform.
* **Allowlisted** a contract and specific function (`mintTo`) for sponsorship.
* Established **per-user** and **global** sponsorship **limits** to control costs.
* Demonstrated the **sponsorship flow** with Smart Accounts using `permissionless`, `viem`, and Foundry-generated private keys.
This approach can greatly improve your onchain app's user experience by removing gas friction. For more complex sponsorship schemes (like daily or weekly cycles), simply tweak your per-user and global limit settings in the Coinbase Developer Platform.
> **Next Steps**
>
> * Use a [proxy service][proxy service] for better endpoint security.
> * Deploy your own contracts and allowlist them.
> * Experiment with bundling multiple calls into a single sponsored transaction.
[Discord]: https://discord.com/invite/cdp
[CDP site]: https://portal.cdp.coinbase.com/
[Coinbase Developer Platform]: https://portal.cdp.coinbase.com/
[proxy service]: /paymaster/guides/paymaster-proxy
[Paymaster Tool]: https://portal.cdp.coinbase.com/products/bundler-and-paymaster
[Foundry]: https://book.getfoundry.sh/getting-started/installation
[simple NFT contract]: https://basescan.org/token/0x83bd615eb93ee1336aca53e185b03b54ff4a17e8
**Happy Building on Base!**
## Test Your Paymaster Policy
Now let's verify that these policies work. We'll:
1. Create two local key pairs (or use private keys you own).
2. Generate two Smart Accounts.
3. Attempt to sponsor multiple transactions to see your policy in action.
### Installing Foundry
1. Ensure you have **Rust** installed
```bash theme={null}
curl --proto '=https' --tlsv1.2 -sSf https://sh.rustup.rs | sh
```
2. Install Foundry
```bash theme={null}
curl -L https://foundry.paradigm.xyz | bash
foundryup
```
3. Verify it works
```bash theme={null}
cast --help
```
If you see Foundry usage info, you're good to go!
### Create Your Project & Generate Key Pairs
1. Make a new folder and install dependencies, `viem` and `permissionless`:
```bash theme={null}
mkdir sponsored_transactions
cd sponsored_transactions
npm init es6
npm install permissionless
npm install viem
touch index.js
```
2. Generate two key pairs with Foundry:
```bash theme={null}
cast wallet new
cast wallet new
```
You'll see something like:
```bash theme={null}
Successfully created new keypair.
Address: 0xD440D746...
Private key: 0x01c9720c1dfa3c9...
```
**Store these private keys somewhere safe**
### Project Structure With Environment Variables
Create a `.env` file in the `sponsored_transactions` directory. In the `.env`, you'll add the rpcURL for your paymaster and the private keys for your accounts:
\[Find your Paymaster & Bundler endpoint]
The Paymaster & Bundler endpoint is the URL for your Coinbase Developer Platform (CDP) Paymaster.
This was saved in the previous section and follows this format: `https://api.developer.coinbase.com/rpc/v1/base/`
Navigate to the [Paymaster Tool] and select the `Configuration` tab at the top of the screen to obtain your RPC URL.
\[Secure your endpoints]
You will create a constant for our Paymaster & Bundler endpoint obtained from cdp.portal.coinbase.com. The most secure way to do this is by using a proxy. For the purposes of this demo, hardcode it into our `index.js` file. For product, we highly recommend using a [proxy service].
```bash lines wrap theme={null}
PAYMASTER_RPC_URL=https://api.developer.coinbase.com/rpc/v1/base/
PRIVATE_KEY_1=0x01c9720c1dfa3c9...
PRIVATE_KEY_2=0xbcd6fbc1dfa3c9...
```
Never commit `.env` files to a public repo!
## Example `index.js`
Below is a full example of how you might structure `index.js`.
```js twoslash [expandable] lines wrap theme={null}
// --- index.js ---
// @noErrors
// 1. Import modules and environment variables
import 'dotenv/config';
import { http, createPublicClient, encodeFunctionData } from 'viem';
import { base } from 'viem/chains';
import { createSmartAccountClient } from 'permissionless';
import { privateKeyToSimpleSmartAccount } from 'permissionless/accounts';
import { createPimlicoPaymasterClient } from 'permissionless/clients/pimlico';
// 2. Retrieve secrets from .env
// Highlight: environment variables for paymaster, private keys
const rpcUrl = process.env.PAYMASTER_RPC_URL; // highlight
const firstPrivateKey = process.env.PRIVATE_KEY_1; // highlight
const secondPrivateKey = process.env.PRIVATE_KEY_2; // highlight
// 3. Declare Base addresses (entrypoint & factory)
const baseEntryPoint = '0x5FF137D4b0FDCD49DcA30c7CF57E578a026d2789';
const baseFactoryAddress = '0x15Ba39375ee2Ab563E8873C8390be6f2E2F50232';
// 4. Create a public client for Base
const publicClient = createPublicClient({
chain: base,
transport: http(rpcUrl),
});
// 5. Setup Paymaster client
const cloudPaymaster = createPimlicoPaymasterClient({
chain: base,
transport: http(rpcUrl),
entryPoint: baseEntryPoint,
});
// 6. Create Smart Accounts from the private keys
async function initSmartAccounts() {
const simpleAccount = await privateKeyToSimpleSmartAccount(publicClient, {
privateKey: firstPrivateKey,
factoryAddress: baseFactoryAddress,
entryPoint: baseEntryPoint,
});
const simpleAccount2 = await privateKeyToSimpleSmartAccount(publicClient, {
privateKey: secondPrivateKey,
factoryAddress: baseFactoryAddress,
entryPoint: baseEntryPoint,
});
// 7. Create SmartAccountClient for each
const smartAccountClient = createSmartAccountClient({
account: simpleAccount,
chain: base,
bundlerTransport: http(rpcUrl),
middleware: {
sponsorUserOperation: cloudPaymaster.sponsorUserOperation,
},
});
const smartAccountClient2 = createSmartAccountClient({
account: simpleAccount2,
chain: base,
bundlerTransport: http(rpcUrl),
middleware: {
sponsorUserOperation: cloudPaymaster.sponsorUserOperation,
},
});
return { smartAccountClient, smartAccountClient2 };
}
// 8. ABI for the NFT contract
const nftAbi = [
// ...
// truncated for brevity
];
// 9. Example function to send a transaction from a given SmartAccountClient
async function sendTransaction(client, recipientAddress) {
try {
// encode the "mintTo" function call
const callData = encodeFunctionData({
abi: nftAbi,
functionName: 'mintTo',
args: [recipientAddress], // highlight: specify who gets the minted NFT
});
const txHash = await client.sendTransaction({
account: client.account,
to: '0x83bd615eb93eE1336acA53e185b03B54fF4A17e8', // address of the NFT contract
data: callData,
value: 0n,
});
console.log(`✅ Transaction successfully sponsored for ${client.account.address}`);
console.log(`🔍 View on BaseScan: https://basescan.org/tx/${txHash}`);
} catch (error) {
console.error('Transaction failed:', error);
}
}
// 10. Main flow: init accounts, send transactions
(async () => {
const { smartAccountClient, smartAccountClient2 } = await initSmartAccounts();
// Send a transaction from the first account
await sendTransaction(smartAccountClient, smartAccountClient.account.address);
// Send a transaction from the second account
// For variety, let's also mint to the second account's own address
await sendTransaction(smartAccountClient2, smartAccountClient2.account.address);
})();
```
Now that the code is implemented, lets run it:
Run this via `node index.js` from your project root.
```bash lines wrap theme={null}
node index.js
```
You should see a "Transaction successfully sponsored" output.
To confirm that your spend policies are correctly in place, try running the script again. If your Paymaster settings are strict (e.g., limit 1 transaction per user), the second time you run the script, you may get a "request denied" error, indicating the policy is working.
## Hitting Policy Limits & Troubleshooting
1. **Per-User Limit**\
If you see an error like:
```json theme={null}
{
"code": -32001,
"message": "request denied - rejected due to maximum per address transaction count reached"
}
```
That means you've hit your **UserOperation** limit for a single account. Return to the [Coinbase Developer Platform] UI to adjust the policy.
2. **Global Limit**\
If you repeatedly run transactions and eventually see:
```json theme={null}
{
"code": -32001,
"message": "request denied - rejected due to max global usd spend limit reached"
}
```
You've hit the **global** limit of sponsored gas. Increase it in the CDP dashboard and wait a few minutes for changes to take effect.
## Verifying Token Ownership (Optional)
Want to confirm the token actually minted? You can read the NFT's `balanceOf` function:
```js lines wrap theme={null}
import { readContract } from 'viem'; // highlight
// example function
async function checkNftBalance(publicClient, contractAddress, abi, ownerAddress) {
const balance = await publicClient.readContract({
address: contractAddress,
abi,
functionName: 'balanceOf',
args: [ownerAddress],
});
console.log(`NFT balance of ${ownerAddress} is now: ${balance}`);
}
```
## Conclusion
In this tutorial, you:
* Set up and **configured** CDP Paymaster on the Coinbase Developer Platform.
* **Allowlisted** a contract and specific function (`mintTo`) for sponsorship.
* Established **per-user** and **global** sponsorship **limits** to control costs.
* Demonstrated the **sponsorship flow** with Smart Accounts using `permissionless`, `viem`, and Foundry-generated private keys.
This approach can greatly improve your onchain app's user experience by removing gas friction. For more complex sponsorship schemes (like daily or weekly cycles), simply tweak your per-user and global limit settings in the Coinbase Developer Platform.
> **Next Steps**
>
> * Use a [proxy service][proxy service] for better endpoint security.
> * Deploy your own contracts and allowlist them.
> * Experiment with bundling multiple calls into a single sponsored transaction.
[Discord]: https://discord.com/invite/cdp
[CDP site]: https://portal.cdp.coinbase.com/
[Coinbase Developer Platform]: https://portal.cdp.coinbase.com/
[proxy service]: /paymaster/guides/paymaster-proxy
[Paymaster Tool]: https://portal.cdp.coinbase.com/products/bundler-and-paymaster
[Foundry]: https://book.getfoundry.sh/getting-started/installation
[simple NFT contract]: https://basescan.org/token/0x83bd615eb93ee1336aca53e185b03b54ff4a17e8
**Happy Building on Base!**