> ## Documentation Index
> Fetch the complete documentation index at: https://docs.cdp.coinbase.com/llms.txt
> Use this file to discover all available pages before exploring further.
# Custom Authentication
export const Tags = ({tags, className}) => {
if (!tags || !Array.isArray(tags)) {
return null;
}
return
{tags.map((tag, index) => {tag})}
;
};
## Overview
Custom authentication enables applications with existing authentication systems to integrate CDP wallets seamlessly. Instead of using CDP's built-in authentication methods (email OTP, SMS, OAuth), you can use JSON Web Tokens (JWTs) from your own Identity Provider.
This approach is ideal when:
* You already have users authenticated via Auth0, Firebase, AWS Cognito, or a custom solution
* You want to implement single sign-on (SSO) across your entire platform
* You need to integrate with corporate identity systems
* You must use specific authentication providers for regulatory compliance
## How it works
Custom authentication follows a straightforward flow that leverages your existing identity infrastructure:
Before users can authenticate, you configure your JWKS (JSON Web Key Set) endpoint in the CDP Portal. This allows CDP to verify the authenticity of JWTs issued by your Identity Provider.
1. **User logs in**: The user authenticates with your existing authentication system (Auth0, Firebase, etc.)
2. **JWT generation**: Your Identity Provider generates a valid JWT for the authenticated user
3. **CDP integration**: Your application provides the JWT to CDP via the `customAuth.getJwt` callback
4. **JWT validation**: CDP retrieves your JWKS endpoint (configured in Portal), validates the JWT signature, and checks required claims (`iss`, `exp`, `iat`, and your configured user identifier claim)
5. **Wallet access**: Upon successful validation, CDP uses the configured claim (default: `sub`) to uniquely identify the user and get or create their user wallet
Unlike CDP's built-in authentication, custom auth sessions are managed entirely by your Identity Provider:
* CDP always requests a fresh JWT via the `getJwt` callback when needed
* Token refresh is handled by your IDP, not CDP
* Session duration is controlled by your IDP's configuration
* Users only need to sign out from your IDP
## Prerequisites
Before implementing custom authentication, ensure your Identity Provider supports:
* **JWKS (JSON Web Key Sets)** with **RS256 or ES256** signing algorithms
* **Required JWT claims**:
* `iss` (issuer): Your Identity Provider's domain
* `sub` (subject): Unique identifier that identifies the particular user on your application (default, but configurable - see [User Identification](#user-identification))
* `exp` (expiration): Token expiration timestamp
* `iat` (issued at): Token issuance timestamp
## 1. Choose how to identify users
CDP uses a specific claim from your JWT to uniquely identify users and associate them with their user wallets. By default, CDP uses the standard `sub` (subject) claim, but you can configure an arbitrary JWT claim to serve as the user identifier.
**Critical requirements for user identifier claims:**
* **Uniqueness**: The claim value must be unique for each user
* **Stability**: The claim value should never change for a user (changing it will create a new wallet)
* **Non-empty**: The claim must always have a value (empty values will cause authentication to fail)
* **Naming rules**:
* Must start with a lowercase letter
* Can only contain lowercase letters and underscores
* Maximum 64 characters
* Cannot be a reserved JWT claim (`iss`, `aud`, `exp`, `iat`, `nbf`, `jti`)
### Default claim
If you don't specify a custom user identifier claim, CDP will use the JWT's `sub` claim:
```json theme={null}
{
"iss": "https://example.auth0.com/",
"sub": "auth0|1234567890", // Used as user identifier by default
"aud": ["test-app"],
"exp": 1700000000,
"iat": 1699996400
}
```
### Custom claim
You can configure CDP to use an arbitrary claim in your JWT as the user identifier. Common alternatives include:
Useful when email is the primary identifier in your system:
```json theme={null}
{
"iss": "https://example.auth0.com/",
"sub": "auth0|1234567890",
"email": "user@example.com", // Configure as user identifier
"aud": ["test-app"],
"exp": 1700000000,
"iat": 1699996400
}
```
**When to use:** Your users primarily identify themselves by email, and emails are stable/don't change.
Useful when usernames are the primary identifier:
```json theme={null}
{
"iss": "https://example.auth0.com/",
"sub": "auth0|1234567890",
"username": "alice123", // Configure as user identifier
"aud": ["test-app"],
"exp": 1700000000,
"iat": 1699996400
}
```
**When to use:** Your application uses stable usernames as the primary identifier.
Useful when you have your own internal user ID system:
```json theme={null}
{
"iss": "https://example.auth0.com/",
"sub": "auth0|1234567890",
"user_id": "usr_abc123def456", // Configure as user identifier
"aud": ["test-app"],
"exp": 1700000000,
"iat": 1699996400
}
```
**When to use:** You have an internal user ID that's stable and want to maintain consistency with your existing systems.
### Best practices
* Use the default `sub` claim unless you have a specific reason to use a different claim
* Avoid claims that users can change (like display names or mutable usernames)
* Test your configuration thoroughly before going to production
* Valid claim name examples: `email`, `username`, `user_id`, `external_id`
* Invalid claim name examples: `Email` (uppercase), `user-id` (dash), `user.id` (dot)
## 2. Configure CDP Portal
To configure custom authentication in the CDP Portal:
Go to the [CDP Portal](https://portal.cdp.coinbase.com/)
Find [custom authentication settings](https://portal.cdp.coinbase.com/products/embedded-wallets/authentication) under your project configuration
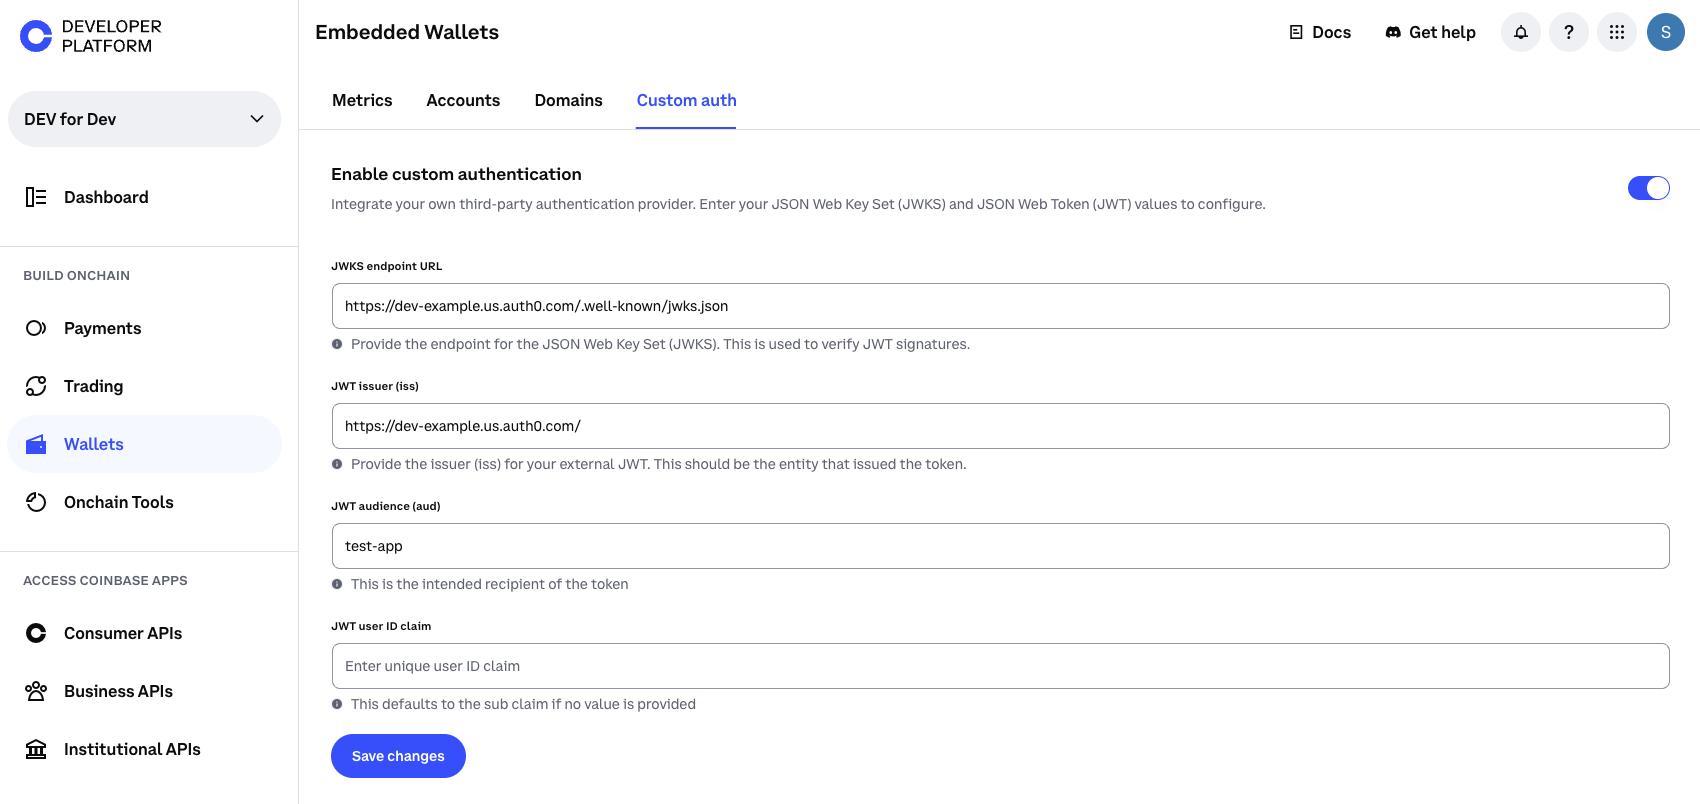 Switch on the toggle if you haven't already
For example: `https://YOUR_DOMAIN.auth0.com/.well-known/jwks.json` if using Auth0
* **Issuer (`iss`)**: Your Identity Provider's domain (required)
* **Audience (`aud`)**: Your API or app identifier
Switch on the toggle if you haven't already
For example: `https://YOUR_DOMAIN.auth0.com/.well-known/jwks.json` if using Auth0
* **Issuer (`iss`)**: Your Identity Provider's domain (required)
* **Audience (`aud`)**: Your API or app identifier
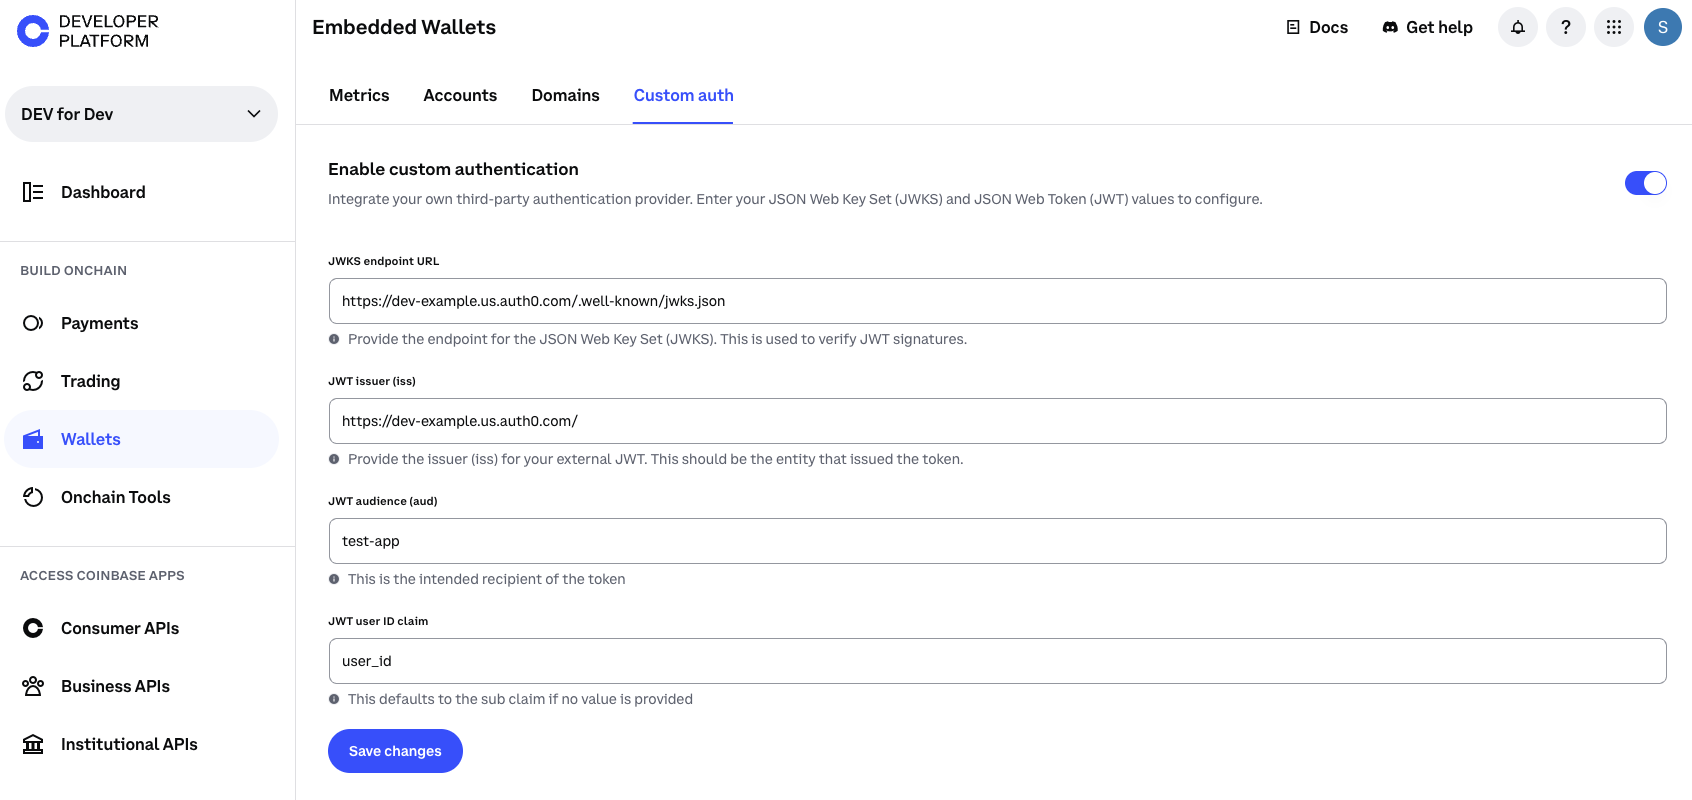 * **User Identifier Claim**: Which JWT claim to use for identifying users
* **Default**: If left empty, CDP uses the standard `sub` claim
* **Examples**: `email`, `username`, `user_id`, `external_id`
* **Validation**: Must start with a lowercase letter, only lowercase letters and underscores
* CDP verifies this claim exists and is non-empty during authentication
**Important considerations:**
* Ensure your JWKS endpoint is publicly accessible over HTTPS. CDP needs to fetch your public keys to validate JWT signatures.
* Once custom authentication is enabled for a project, standard authentication methods (email OTP, SMS, OAuth) are not available, and vice versa. You cannot use both simultaneously.
## 3. Integrate the SDK
The CDP Frontend SDK provides built-in support for custom authentication through the `customAuth` configuration option.
### React
For React applications, use `CDPHooksProvider` or `CDPReactProvider` with the `customAuth` configuration:
```tsx Auth0 (React) theme={null}
import { CDPHooksProvider } from '@coinbase/cdp-hooks';
import { useAuth0 } from '@auth0/auth0-react';
function AppWrapper() {
const { getAccessTokenSilently } = useAuth0();
return (
);
}
```
```tsx Auth0 (React Native) theme={null}
import { CDPHooksProvider } from '@coinbase/cdp-hooks';
import { useAuth0 } from '@auth0/auth0-react-native';
function AppWrapper() {
const { getCredentials } = useAuth0();
return (
{
const credentials = await getCredentials();
return credentials?.accessToken;
}
},
ethereum: {
createOnLogin: 'eoa'
}
}}
>
);
}
```
### Non-React
For vanilla JavaScript/TypeScript or other frameworks, use the `initialize` method from `@coinbase/cdp-core`:
```typescript Auth0 (Vanilla JS) theme={null}
import { initialize } from '@coinbase/cdp-core';
await initialize({
projectId: 'your-project-id',
customAuth: {
getJwt: async () => {
try {
return await auth0.getTokenSilently();
} catch (error) {
console.error('Failed to get token:', error);
return undefined;
}
}
}
});
```
The `getJwt` callback is called automatically by CDP whenever authentication is needed. It should return a fresh JWT from your Identity Provider or `undefined` if the user is not authenticated.
## 4. Implement auth flow
Once you've configured custom authentication, you need to explicitly authenticate the user with CDP after they log in with your Identity Provider.
### Triggering auth
After your user logs in with your IDP (Auth0, Firebase, etc.), call `authenticateWithJWT()` to authenticate with CDP:
* **First-time users**: CDP will create a new user wallet for the user (based on the configured user identifier claim, defaulting to `sub`)
* **Returning users**: CDP will retrieve their existing wallet (using the same user identifier claim value)
```tsx theme={null}
import { useAuthenticateWithJWT } from '@coinbase/cdp-hooks';
import { useAuth0 } from '@auth0/auth0-react';
function LoginComponent() {
const { authenticateWithJWT, isLoading } = useAuthenticateWithJWT();
const { loginWithRedirect, isAuthenticated } = useAuth0();
const handleLogin = async () => {
// First, log in with your IDP (Auth0 in this example)
await loginWithRedirect();
};
// After Auth0 login completes, authenticate with CDP
React.useEffect(() => {
if (isAuthenticated) {
authenticateWithJWT()
.then(() => console.log('Successfully authenticated with CDP'))
.catch((error) => console.error('CDP authentication failed:', error));
}
}, [isAuthenticated, authenticateWithJWT]);
return (
);
}
```
### Accessing wallet data
Once authenticated with CDP, you can access the user's wallet:
```tsx theme={null}
import { useCurrentUser, useEvmAddress } from '@coinbase/cdp-hooks';
function WalletComponent() {
const { currentUser } = useCurrentUser();
const { evmAddress } = useEvmAddress();
if (!currentUser) {
return
* **User Identifier Claim**: Which JWT claim to use for identifying users
* **Default**: If left empty, CDP uses the standard `sub` claim
* **Examples**: `email`, `username`, `user_id`, `external_id`
* **Validation**: Must start with a lowercase letter, only lowercase letters and underscores
* CDP verifies this claim exists and is non-empty during authentication
**Important considerations:**
* Ensure your JWKS endpoint is publicly accessible over HTTPS. CDP needs to fetch your public keys to validate JWT signatures.
* Once custom authentication is enabled for a project, standard authentication methods (email OTP, SMS, OAuth) are not available, and vice versa. You cannot use both simultaneously.
## 3. Integrate the SDK
The CDP Frontend SDK provides built-in support for custom authentication through the `customAuth` configuration option.
### React
For React applications, use `CDPHooksProvider` or `CDPReactProvider` with the `customAuth` configuration:
```tsx Auth0 (React) theme={null}
import { CDPHooksProvider } from '@coinbase/cdp-hooks';
import { useAuth0 } from '@auth0/auth0-react';
function AppWrapper() {
const { getAccessTokenSilently } = useAuth0();
return (
);
}
```
```tsx Auth0 (React Native) theme={null}
import { CDPHooksProvider } from '@coinbase/cdp-hooks';
import { useAuth0 } from '@auth0/auth0-react-native';
function AppWrapper() {
const { getCredentials } = useAuth0();
return (
{
const credentials = await getCredentials();
return credentials?.accessToken;
}
},
ethereum: {
createOnLogin: 'eoa'
}
}}
>
);
}
```
### Non-React
For vanilla JavaScript/TypeScript or other frameworks, use the `initialize` method from `@coinbase/cdp-core`:
```typescript Auth0 (Vanilla JS) theme={null}
import { initialize } from '@coinbase/cdp-core';
await initialize({
projectId: 'your-project-id',
customAuth: {
getJwt: async () => {
try {
return await auth0.getTokenSilently();
} catch (error) {
console.error('Failed to get token:', error);
return undefined;
}
}
}
});
```
The `getJwt` callback is called automatically by CDP whenever authentication is needed. It should return a fresh JWT from your Identity Provider or `undefined` if the user is not authenticated.
## 4. Implement auth flow
Once you've configured custom authentication, you need to explicitly authenticate the user with CDP after they log in with your Identity Provider.
### Triggering auth
After your user logs in with your IDP (Auth0, Firebase, etc.), call `authenticateWithJWT()` to authenticate with CDP:
* **First-time users**: CDP will create a new user wallet for the user (based on the configured user identifier claim, defaulting to `sub`)
* **Returning users**: CDP will retrieve their existing wallet (using the same user identifier claim value)
```tsx theme={null}
import { useAuthenticateWithJWT } from '@coinbase/cdp-hooks';
import { useAuth0 } from '@auth0/auth0-react';
function LoginComponent() {
const { authenticateWithJWT, isLoading } = useAuthenticateWithJWT();
const { loginWithRedirect, isAuthenticated } = useAuth0();
const handleLogin = async () => {
// First, log in with your IDP (Auth0 in this example)
await loginWithRedirect();
};
// After Auth0 login completes, authenticate with CDP
React.useEffect(() => {
if (isAuthenticated) {
authenticateWithJWT()
.then(() => console.log('Successfully authenticated with CDP'))
.catch((error) => console.error('CDP authentication failed:', error));
}
}, [isAuthenticated, authenticateWithJWT]);
return (
);
}
```
### Accessing wallet data
Once authenticated with CDP, you can access the user's wallet:
```tsx theme={null}
import { useCurrentUser, useEvmAddress } from '@coinbase/cdp-hooks';
function WalletComponent() {
const { currentUser } = useCurrentUser();
const { evmAddress } = useEvmAddress();
if (!currentUser) {
return Please sign in with your account
;
}
return (
User ID: {currentUser.id}
Wallet Address: {evmAddress}
);
}
```
### Monitoring auth state
Use the `useIsSignedIn` hook to monitor authentication state:
```tsx theme={null}
import { useIsSignedIn } from '@coinbase/cdp-hooks';
function App() {
const { isSignedIn } = useIsSignedIn();
return (
{isSignedIn ? (
You are signed in
) : (
Please sign in
)}