

Concepts
Server-Signer
Server Wallet’s 2-of-2 MPC option uses the Coinbase Server-Signer to simplify key management with a no-code setup on your cloud provider. You can host your Server-Signer on AWS with a quick 10-minute setup.
API Wallets created with Server-Signer and the 2-of-2 MPC configuration leverage advanced cryptographic techniques for enhanced usability and security. MPC splits private keys into two shares, one held by Coinbase and the other by the developer, ensuring two security domains protect your wallets.
The Server-Signer manages your key share and collaborates with Coinbase to sign transactions using advanced cryptography. It is designed to be secure, scalable, and resilient and provides the following capabilities:
The Server-Signer is currently supported only on AWS. You can easily deploy it using AWS CloudFormation with just a few clicks. Once deployed, the Server-Signer continuously monitors the CDP backend for any new actions related to your CDP Project.
It performs two types of operations:


See below for an example of stack creation in progress: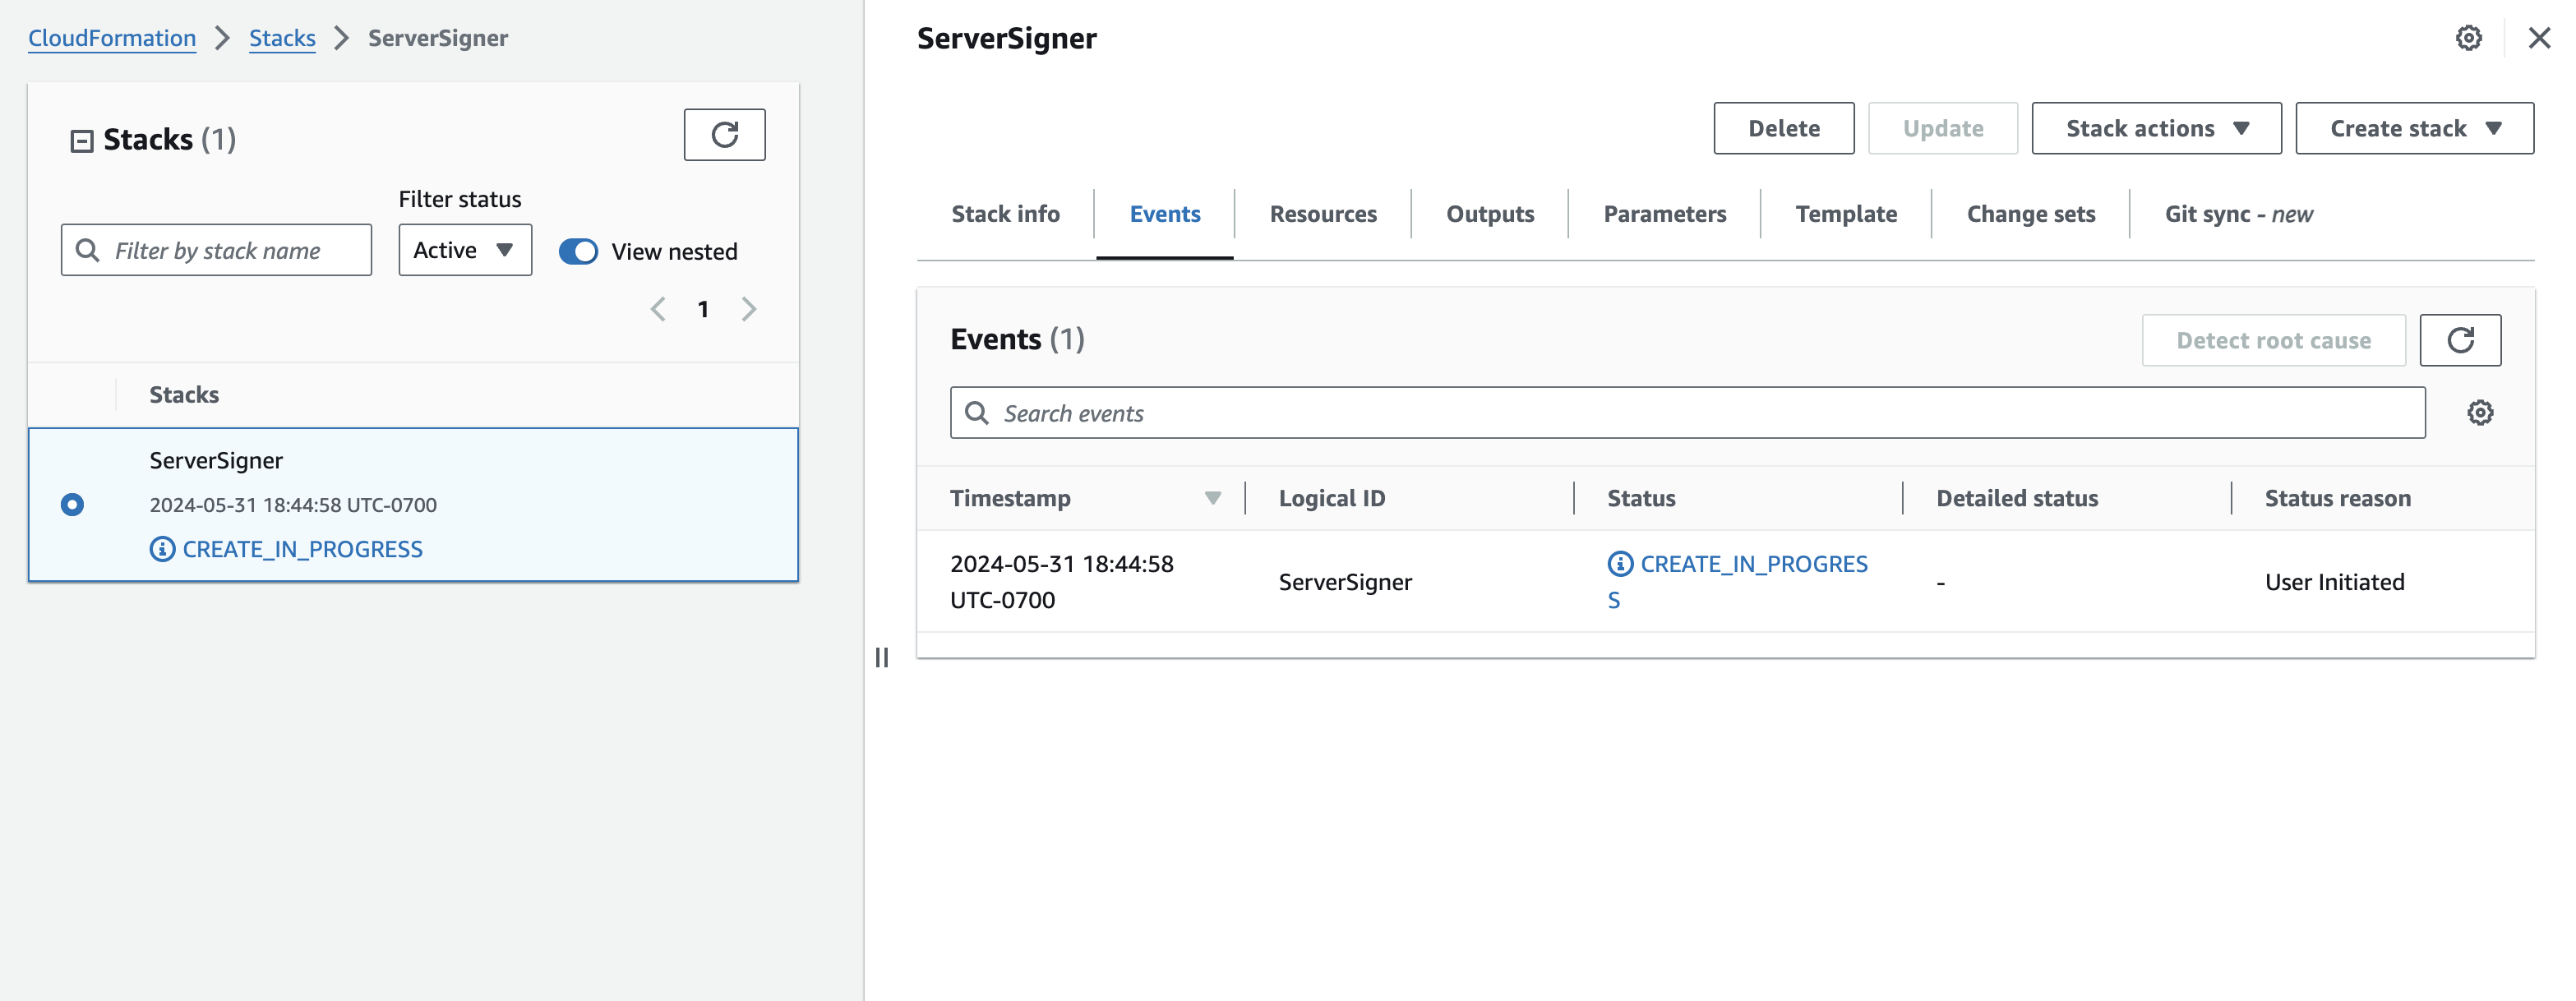
Within ~10 minutes, your stack will be created. You will see
Once the stack is created, you will see similar output to the example below: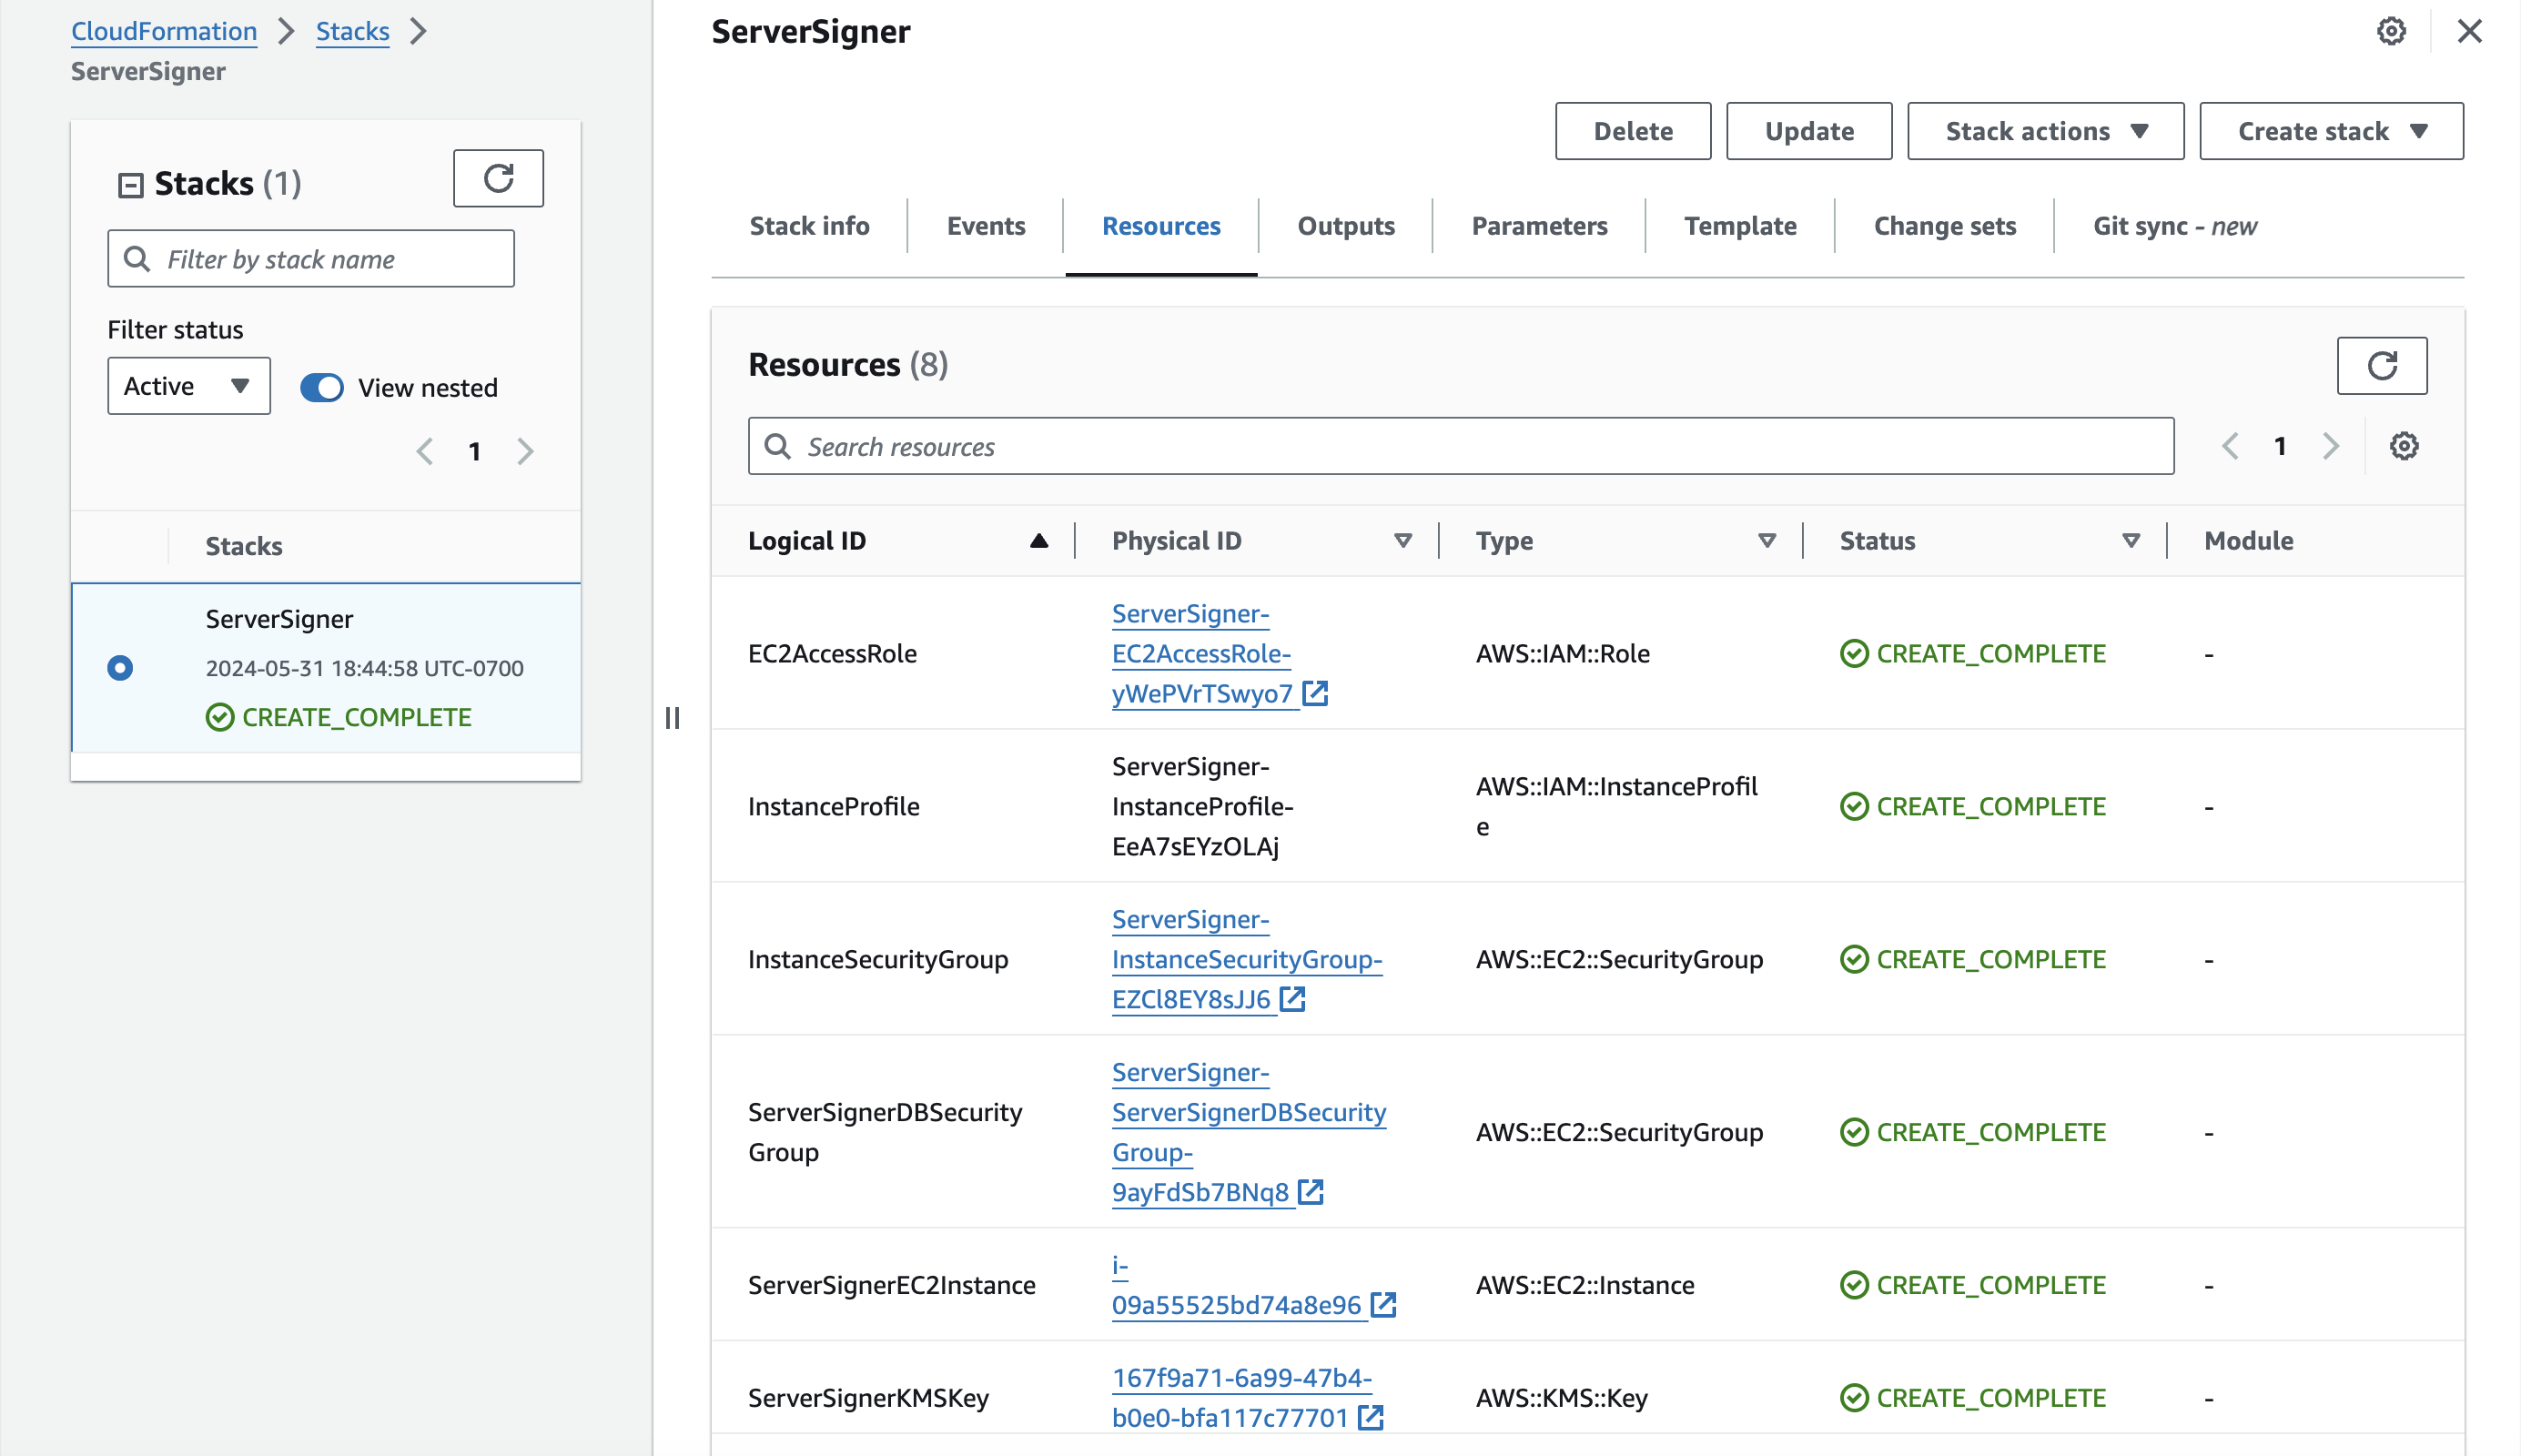
The stack creates the following resources created for your Server-Signer:
The Server-Signer is now ready to be used with the CDP SDK. To make the Server-Signer perform its actions, invoke the methods in CDP SDK.
If you do not see a Server-Signer for your project, ensure the deployment of the Server-Signer was successful and follow the troubleshooting guide.
From this point forward, all wallets created using the CDP SDK in the current session are managed by the Server-Signer.
Wallet creation will take a few seconds because the transaction is orchestrated using the Server-Signer.
If you do not see the process running, restart the system service with the following command:
If the issue is not resolved with above steps, reach us out on discord at Coinbase Developers Discord for help.
The binary is updated now and can be verified by creating a new wallet or signing with an existing one.
- Key Generation: The Server-Signer generates private keys for the wallets you create using the CDP SDK. The keys are securely generated through an MPC protocol. One keyshare is stored in the developer’s AWS account and the other keyshare with Coinbase.
- Key Signing: The Server-Signer connects to CDP backend to facilitate transaction signing. It only signs transactions that you, as a developer, create using the CDP SDK.
- Backup: Key materials are backed-up by AWS with the Aurora DB backup policies.
- Security: Private keys created by Server-Signer are always split between Coinbase servers and your own Server-Signer instance. No single party ever holds a full private key, meaning a signature requires cooperation between both parties. This provides security even if one’s systems are compromised.
secure your aws accountCoinbase cannot guarantee the security of the Server-Signer deployment as this is not a hosted solution. You, the developer are responsible for securing your AWS account where Server-Signer is deployed, and performing upgrades on your system, etc.
- Distributed key generation for wallets within your project.
- Creating a signature for a transaction that is pending broadcast for wallets in your project.
Cost estimation
Since the Server-Signer provisions AWS resources, it generates AWS costs. You can use this AWS library to estimate the AWS costs, based on the CloudFormation template. The estimate provided is approximately $60 (USD) per month in the us-east-1 region, with the largest contributor being RDS usage. This is a baseline estimate, and your AWS costs for Server-Signer may vary based on your usage. Example cost estimation call to AWS:Deploy Server-Signer on AWS
Step 1: Create CDP Secret API key and AWS SSH KeyPair
CDP Secret API Key Download a Secret API key from the Coinbase Developer Platform. See CDP API Key Management for detailed steps. This key is used by your Server-Signer to authenticate against CDP backend services.Only one Server-Signer can be associated with a CDP Project.
Step 2: Create a new stack
- Go to CloudFormation stack on your AWS Console.
- Click on the Create stack button.
- Select “Choose an existing template” option.
- Select “Amazon S3 URL” as your template source.
- Paste the URL https://cdp-server-signer-public.s3.amazonaws.com/templates/0.0.15/server-signer.yaml in the Amazon S3 URL field.
- Click Next on this page.
Do not delete the CloudFormation stack, as this would lead to losing your private key shares.
Configuration example
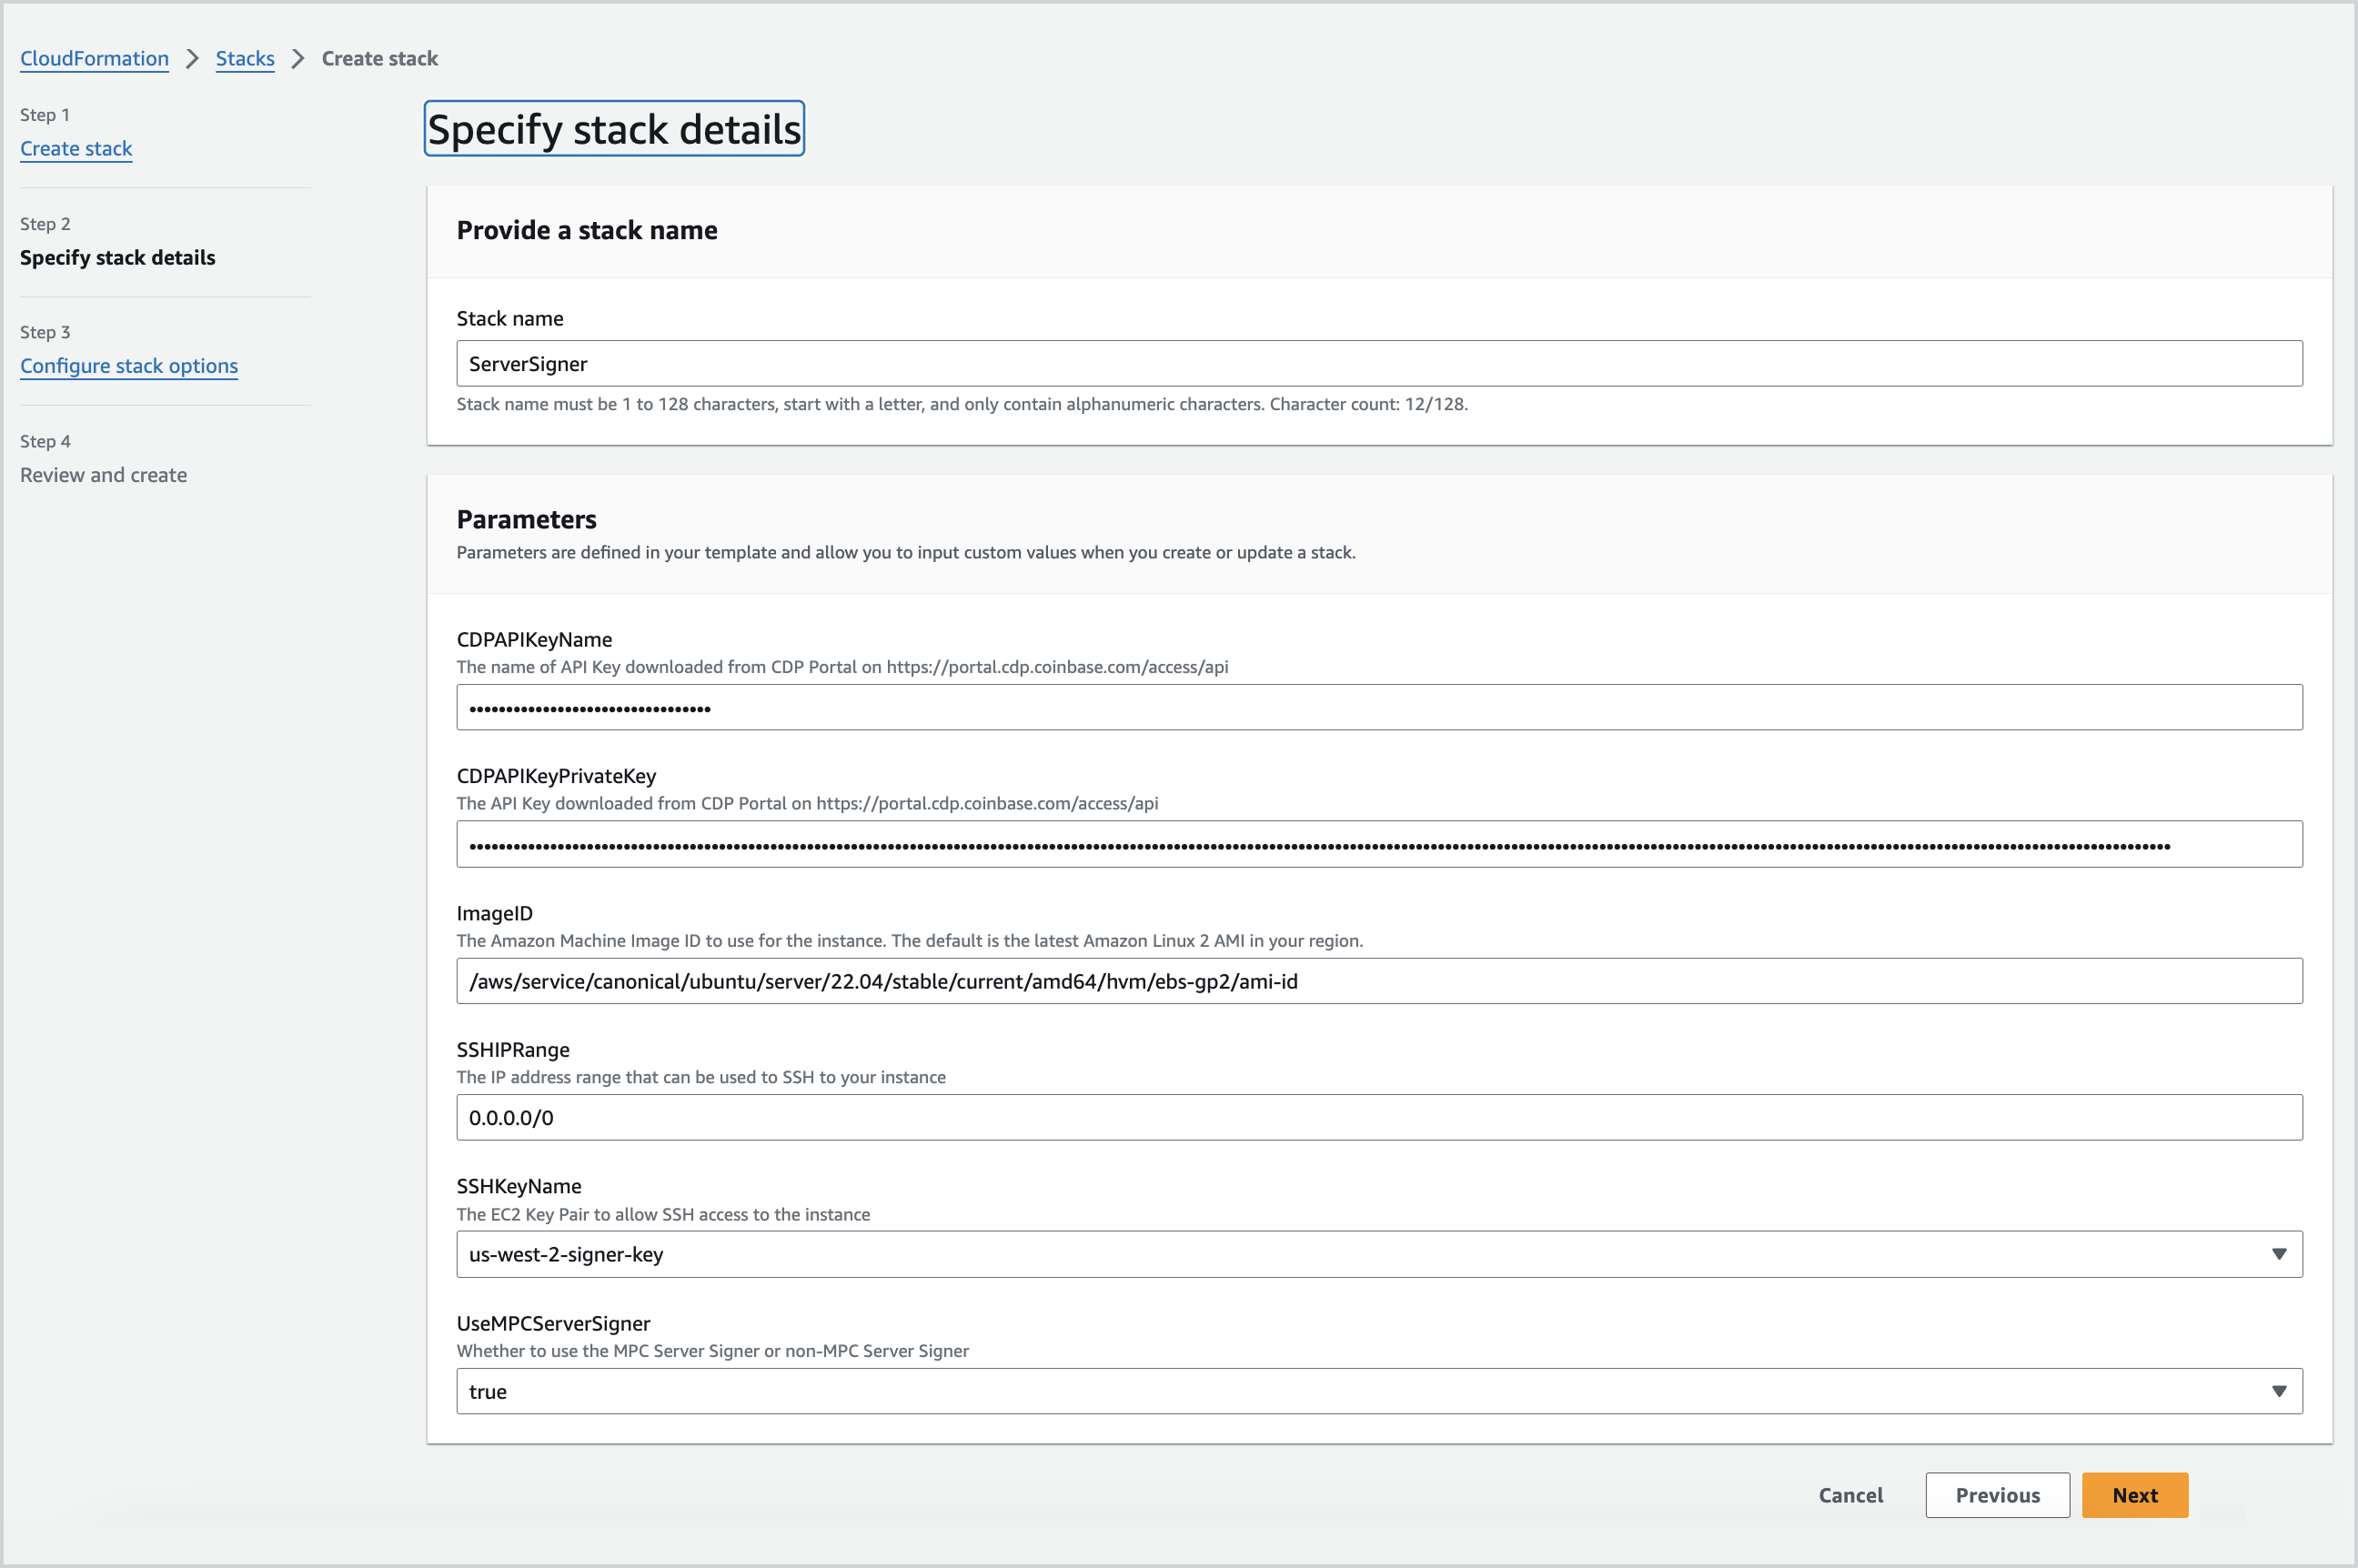
Step 3: Specify stack details
- Fill in the following parameters in the CloudFormation stack:
- Stack name: Enter a unique stack name to identify your stack.
- CDPAPIKeyName: Enter the name of your downloaded CDP secret API key. This corresponds to the
namefield in the JSON file. - CDPAPIKeyPrivateKey: Enter the CDP secret API key itself. This corresponds to the
privateKeyfield in the JSON file. - ImageID: Enter the optional AMI ID if you prefer to use a different AMI. The default AMI used will be the Amazon Linux 2 AMI in your region.
- SSHIPRange: Configure the IP range from which you want to SSH to your Server-Signer.
- SSHKeyName: Select the EC2 key pair you created in step 1.
- UseMPCServerSigner: Set this to true.
SSH IP RangeBy default, the Server-Signer allows SSH access from any IP, provided it has the right SSH key. Use
SSHIPRange to restrict this to a specific IP range for security reasons.CloudFormation stack details example
- Click Next on this page.
Step 4: Configure stack options
- Under “Stack failure options”, select the “Delete all newly created resources” option.
- Click Next on this page.
Step 5: Review and create stack
- Check I acknowledge that AWS CloudFormation might create IAM resources.
- Click Submit on this page.
Step 6: Wait for the stack to be created
Do not remove your payment credentials on AWS after deploying the stack. If a valid payment method is not on file, AWS could shut down your RDS cluster.
See below for an example of stack creation in progress:
Within ~10 minutes, your stack will be created. You will see
CREATE_COMPLETE status for the stack as shown below.
Once the stack is created, you will see similar output to the example below:
The stack creates the following resources created for your Server-Signer:
- EC2 instance that hosts the Server-Signer.
- Aurora DB that stores the encrypted MPC key share and other metadata for your Wallets.
- Symmetric AWS KMS key that performs encryption operations for the MPC protocol.
- Asymmetric AWS KMS key that is used as identity key for the Server-Signer.
- Security groups and IAM roles for the functioning of the Server-Signer.
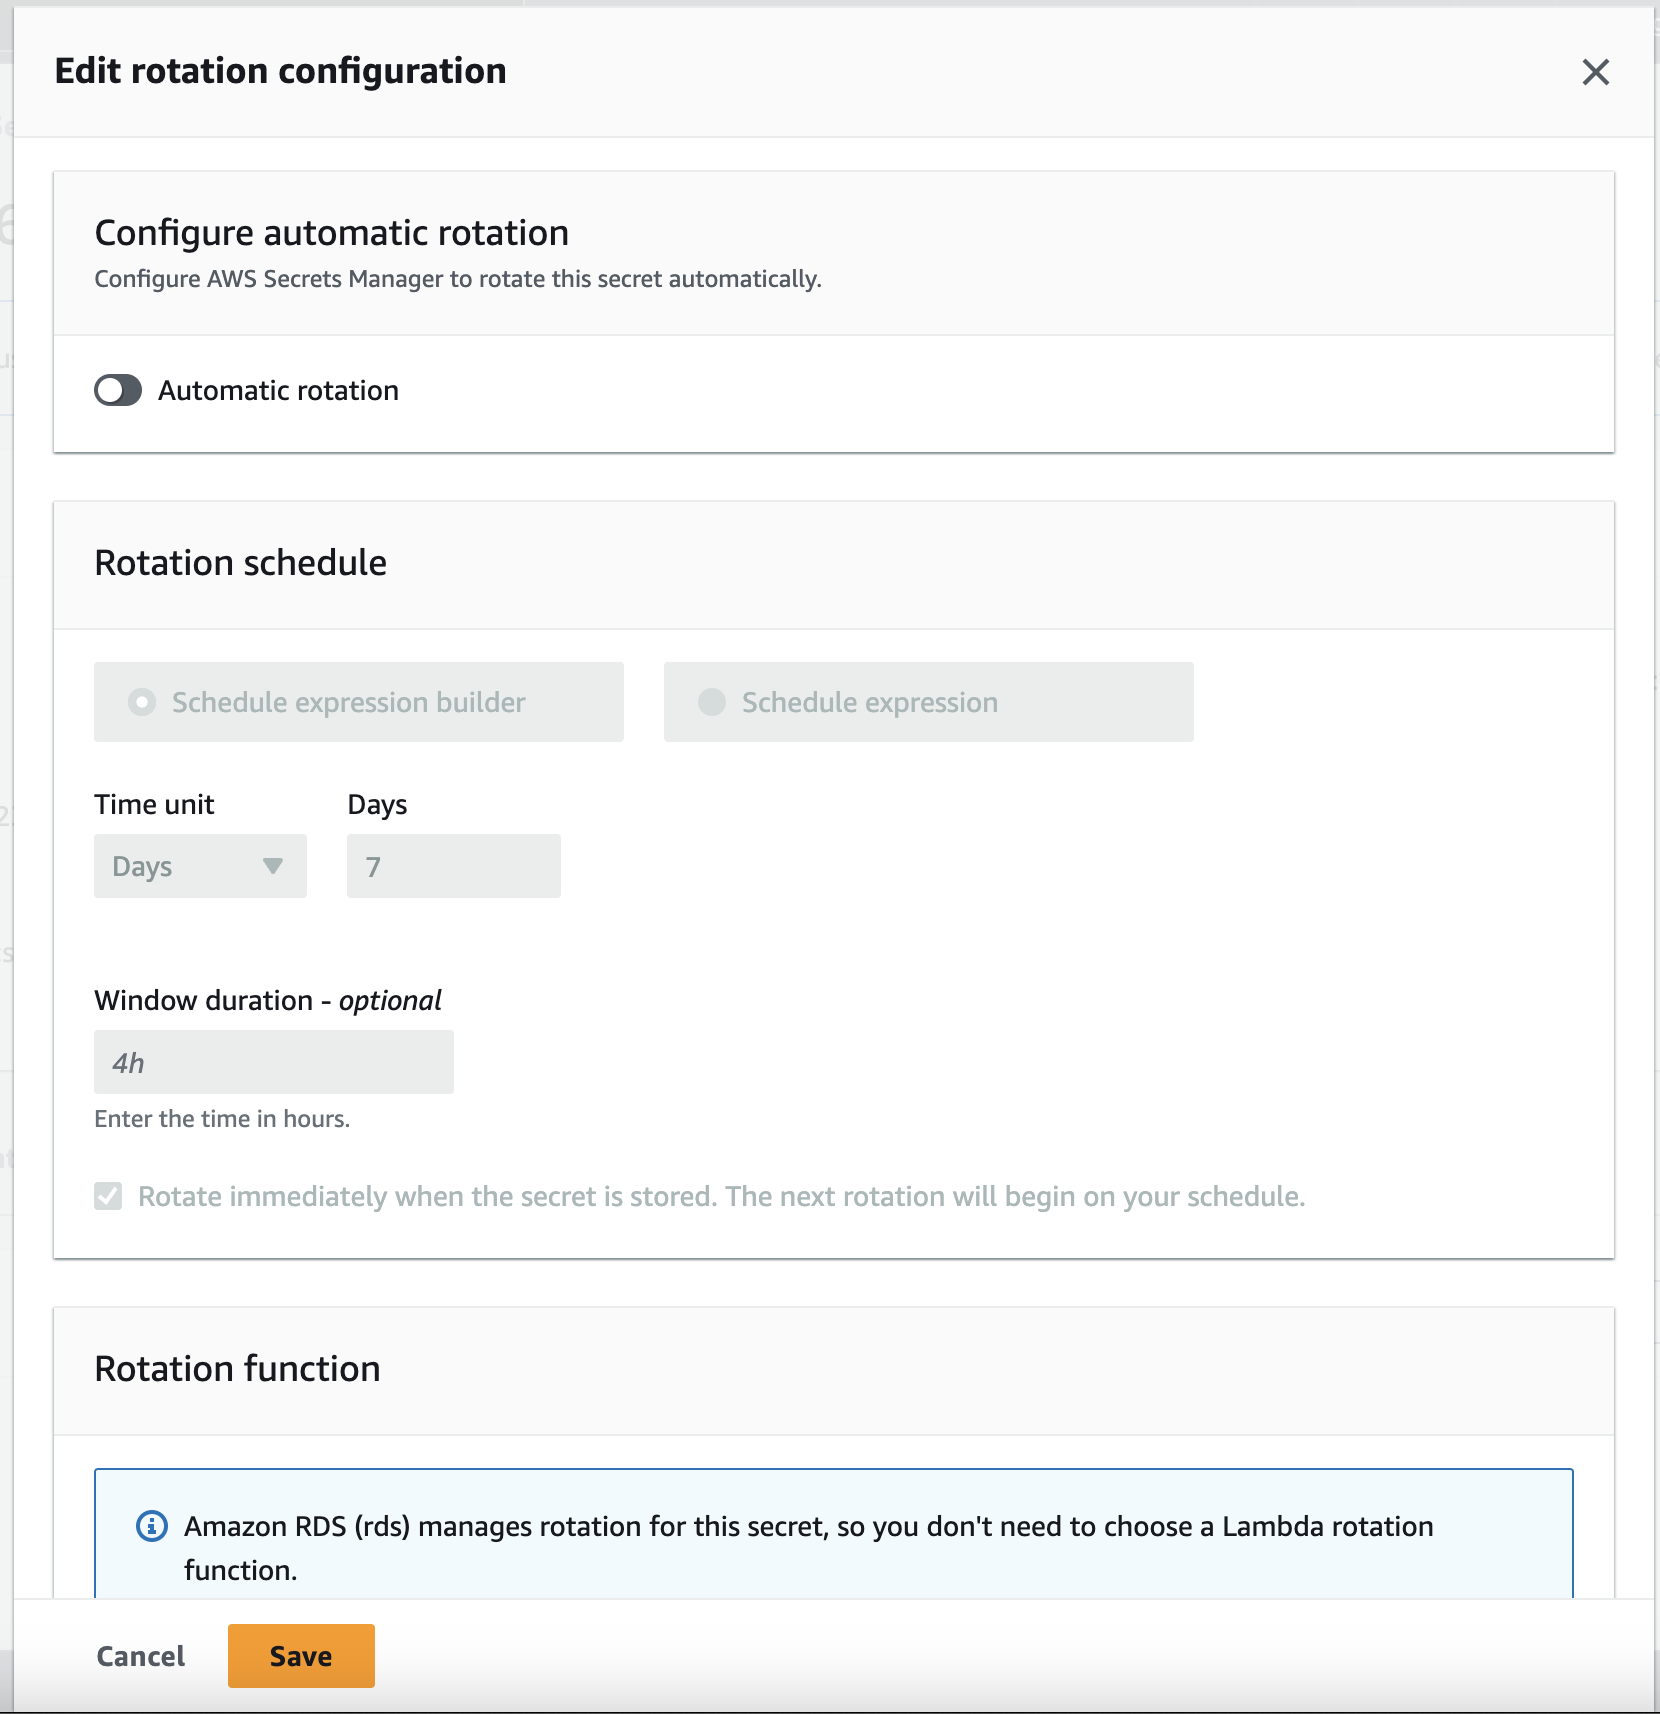
Step 7: Disable auto-rotation of RDS password
The RDS cluster is created with auto-rotation enabled by default for the database password. However, the stack does not account for the default 7-day rotation policy, and it is necessary to disable it. To disable the rotation policy, follow the steps below:- Go to AWS Secrets Manager here.
- Find the secret associated with primary RDS DB cluster for your CloudFormation stack.
- Go to rotation tab, click on
Edit rotationand disableAutomatic Rotation
Disable auto-rotation of RDS password
The Server-Signer is now ready to be used with the CDP SDK. To make the Server-Signer perform its actions, invoke the methods in CDP SDK.
Use CDP SDK to create 2-of-2 API Wallets with Server-Signer
Initialize the CDP SDK
Follow the quickstart to get an overview of the CDP SDK. To initialize the CDP SDK, use a CDP secret API key that is created for the same project as the Server-Signer. This is important because Server-Signers are scoped to the specific project they are created for and can only create wallets within that project.Server-Signers are created for a specific CDP project. Ensure that the CDP secret API key used to initialize the SDK
is for the same project.